Friday 30 May 2008

Good luck!

I was feeling bright and summery when I thought of this card. I'd just spent a lovely weekend with my mom making all the various stationary for my wedding and although we were a little crafted out after putting so many necessary hours in on the wedding stuff, I had half hour left in me to come up with this.

It was very simple - I used PM inspirations papers (I think they were all from the 'Flowery' stack and cut out the flowers from a sheet of that, then layered them accordingly.

The 'Good luck' was a font I found off the internet which I simply printed onto plain paper, and used my glue pen to draw over and emboss with black embossing powder to make it stand out a little better.

I simply mounted it onto coordinating paper, rubbed over the edges (a little too enthusiastically in places!!) and stuck it on the card. If I did this card again, I'd mount the flowery paper on card before cutting them out so I could do some 3d work with it. Not decoupage exactly, but something with a little more 'lift'.

Thursday 29 May 2008

Have a wonderful day


Another magazine inspiration, slightly changed around to incorporate what products I owned at the time!

I like the simplicity of this card and I love how the bead work lifts what would otherwise be quite boring to something unique and tactile.

Pocket full of posies


I made this card using two punches, a flower shaped one and a leaf shaped one. I punched out the flower on printed pink vellum and used an embossing ball pen to 'curl' the individual petals.

I cut out strips of green papers to mimick the stalks and attached the leaf punch outs at various levels, added a pretty pink gingham bow and viola! that finished the topper.

I simple added a sentiment at the bottom of the card and attached it with eyelets.

Great girly card, but the colour scheme can be altered for less barbie doll appeal...

Wedded bliss and bling

I had a horrible time with this card trying to get the rub on to rub off! I was so angry with it not working...I had to re do the actual card I sent to the happy couple because this card has got so many indents from where I was trying to get the rub on to work; it looks a right mess, although from the photo you'd never know ;o)

I had used Papermania rub ons once before and had the same problem, but that time I wrote to DoCrafts asking for an explanation - why weren't there rub ons rubbing on and what can I do about it?!? Apparently, there were some faulty batches that slipped through their quality testing. They sent me loads of freebie goodies to apologise, which was lovely, however, that doesn't help that loads of craft shops/sites with old PM stock are stiill selling these defective rub ons - and you don't know until you get them home!

Anyway, rant over and back to the card...the stamp was a PM ornate stamp that I used a decoupage effect with by stamping it several times and cutting out and layering to highlight the shapes in the stamp. I then used a felt tip (!) to colour various parts in and glue and glitter to glitter the detail. I love the rich effect this gives and it suited the bride and groom in question down to a T!

Masculine Birthday (Contemporary)

This was in response to a similar card I saw on www.docrafts.co.uk by a designer called Jenny Pearce. The reviews for this card weren't that great, but I thought it was a brilliant card for a last-minute man card - and masculine cards are always so difficult (awkward beggers!!) so I gave it a go just to see. It's not my favourite card by a long shot, but it serves a purpose.

Retro Christmas (even though it's May...)

These are the cards I did for Christmas the year before last. The first card is based on a design idea that was on Michael's website (in the USA), here's the link to the site, but I'm sure the designs will have been removed by now: http://www.michaels.com/ The second card was me moving on from that initial design with my own take using the same stamp set.


They were fairly quick and simple to do - a must for mass production cards - and I really enjoyed making them in a conveyer belt fashion.

happy birthday happy birthday happy birthday happy birthday happy birthday happy birthday


I had some fun playing with watercolours for this card. I just used my (relatively cheap) set of water colour pencils and just went crazy! It's colourful and I like the effect, although the design itself looks a bit lost on the card. It needs something else, but I'm not sure what...it's ok like this though, and I'm sure someone will love having this given to them for their birthday!

Thursday 22 May 2008

Wedded bliss!


This was a card a friend asked me to do for a wedding she couldn't go to. It was out in New Zealand, so the couple had a small do when they got back for those that couldn't make it. So their card could have a personalised photo of them on their big day.

I love this card. The bride is Asian, and the rich reds and glitter fit her personality and culture perfectly. I don't often use Anita's Outline stickers because I think they look tacky...sorry, but it's just my opinion...but I think the heart has worked well here to finish the card off nicely.

The close up below shows how the layering was acheived using a part of a Papermania Ornate stamp with 3d stickys and a brad to finish the effect.

Mosaic Madness


Again, this is a design taken wholesale from http://docrafts.co.uk/asp/projects/project.asp?id=947 by a designer called Jenny Pearce. I just loved how simple and quick the design is, whilst still being so effective. You could make so many variations on this theme, the list would be endless. Great cards to do en masse!

I love making cards from someone else's instructions, but I still prefer designing and making my own. Unfortunately, while I'm so busy planning my wedding, all my designs remain just that - scribbles in my 'Card Making Creations' book to make at a future date. Watch this space though, I intend on getting down to some this weekend :o)

Ornate punches - I love 'em!!


I really enjoyed making these cards...they were relatively quick and the effect is great! The design is adapted from http://docrafts.co.uk/asp/projects/project.asp?id=1437 just cos I loved this design so much. Katy Godbeer is such a talented designer.


The hardest part about these cards was lining up the punch correctly. For some reason, the Papermania punch I used didn't have a flat surface inside the punch to 'bump' the paper up to, so it was hard to make sure the punches stayed in a similar orientation, parellel to the edge of the card. This was a dissapointment from the design point of view of the punch, but with a little perseverance I won in the end and the effect was worth it!


Monday 19 May 2008

Oh dear!

Oops! I've had a very slow day at work and it's taken its toll on my bank account...have ordered some bits and bobs for my Cuttlebug (which I don't yet own!!) from a lovely cheap site in America, www.ohmycrafts.com. They had some great offers on Alphabet dies, so I just couldn't resist and then to make the postage 'worthwhile' I got some very reduced priced embossing folders too! Altogether, I only spent £40 so it's not too bad really, just feels very decadant! I also got some paper stock that I've been meaning to get for a while, so watch this space for some new cards as soon as my stuff starts coming through! I ordered the paper from www.firststopstationers.co.uk and within 40 minutes from receiving the order, they had processed and dispatched it. Very impressed, but now I'm all spent out!

Thursday 15 May 2008

Chirpy Flower Card - Glass Painted


I wanted a bright, funky card using acetate and glass aqua paint. I used an Anita's peel off sticker on acetate and coloured it from the back using primary colours and mixing slightly to blend.

I did raise the image using 3d stickers to allow the light through, but at the time I had no eyelets, so I just drew my own using the outline paint! If I did this card again, I would be happy to use the acetate/glass painted part, but I would try something else for the birthday message.

Let's Celebrate!


This card was inspired by an amalgamation of several designs I'd seen over a period of a few months, so I don't think I'm infringing copyright by saying that my interpretation and final design is my own.
I carved the wiggly line stamp myself to create the background, then it was a simple matter of adding the two mounted See-D's stamp images to complete the card. Apart from the stamp carving, the card was really quick, and was enthusiastically recieved by the recipient! Success!

Watercolour flowers


Another early card, the original design is taken from a book, which I will dig out and cite as soon as I can.
This taught me how to use my watercolour pencils and I had great fun experimenting with them! I love the effect because you feel you're being really artistic and the effect you get is really artistic, but it's actually just a simple case of colour in the lines, paying attention to where the 'light' hits!
Considering it's hand painted, this card did not take long. The only necessity is STAZ-ON ink pads so the image does not blur when you add water, and good quality card stock so the card doesn't warp when drying.
Have a go, it was so much fun!

Silver foil mosaic punch card


I'm not sure about this card. I went for the simple look, but I think it's a little too simple....but nevermind, not all cards are what you expect!

I used holographic foils and put some DSST on the back of the punched strip and rubbed the foils off using a embossing tool.

I think this effect could work but the card definitely needs livening up!

Favour box layout


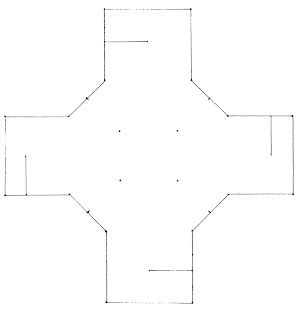
This is the favour box template I am using for my wedding this August. You can print it out directly onto A4 paper. You should cut along all of the lines, then score between all of the dots. I will add a picture of the finished box later. I designed this box so that there is NO GLUE REQUIRED because making loads of favour boxes just gets silly if you have to glue them all aswell. Also, the box requires no lid; the flaps on top just slot together two times (smaller flaps first) and you have a very strong box to store your goodies in. Obviously, you will need to do something more decorative with the outside flaps, but I've left this as the basic design so it is not in any way restricted.

Feel free to use this design in your own work! I'd be flattered! Just post a link back to this entry please ;-)

3rd April 2009 - Janette, as requested, I've taken some pictures of the box made up. I've made the flaps a little bit more interesting by altering the final template, but the basic template is as above.


Happy Birthday Stars


I used See-D's stamp sets for this card, and I believe the design is taken/adapted from a DoCrafts magazine/website (http://www.docrafts.co.uk/). I was really short of paper at the time and only had white paper, so all the colouring was done by rubbing chalks onto the paper. I love this effect, but it took ages!

This is a great card for both sexes and remains a firm favourite. Thanks for the inspiration DoCrafts!

Playing with my new punch...

I created this while playing around with my new punch that I bought. I know it's a really simple card, and took like 10 mins to make, but I like it! It could be anything; birthday, thank you, thinking of you, but I haven't put a message on the front because I liked the symmetry of how it looks as is. The message can of course go inside, or if I did decide to put it on the front, I would do it in fancy swirly gold embossing in the bottom right hand corner.

This card is great for making several at once and the design could be altered slightly to make some very quick Christmas cards, simply by changing the punch to a snowflake punch or such like.

Thanks Dad!


This was a card I made for my Dad last year. He gave up his spare time to come and live with us to help us get our new house straight with loads of DIY work. He's a star, and I know the card didn't do him justice, but I couldn't (and still can't) get to all of my craft stuff due to the work being done on the house :-(

As you can see, it's a simple card, but great for a male recipient. Males are always difficult to do cards for, don't you think?!?

Stars and Swirls Birthday card


This is a card I created some time back, when I first started card making. The design and idea was straight from a book, which I will dig out and give credit for when I can find it! I've changed it from a Happy New Year card to a birthday card, but there is not much changed from the original artists' conception, so credit where credit's due.

I've put a few close ups of the writing, which was done by free-hand. I love how putting bobbles on the end of each letter stick makes fairly boring writing that's obvioulsy handwritten, spring to life and look like a stamped image!

Wednesday 14 May 2008

Wedding card


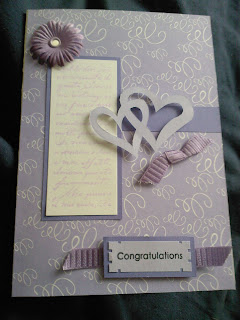
I've wanted to do a blog for ages, and now I've finally got around to it! I was asked to do this card for a work colleague LAST NIGHT to give to her today (nothing like last minute, eh?!), so I think I've made the best of what I could...her wedding 'theme' is lilac, not one of my favourite colours to work with so your comments on how it's turned out would be most appreciated.

I made this card by using a blank white cardstock (all I had!) covered with some patterned purple paper. Originally I'd ran the edges down a purple ink pad, but I didn't like the effect as the paper was too flimsy to do it properly. I stamped the writing stamp twice onto cream paper and used the second imprint, which was more muted. Then I added a flower (silk?) with an eyelet.

The two hearts were drawn free-hand on the reverse of the paper and cut out using a craft knife. I'm looking forward to getting my Cuttlebug so I can do this quicker and with more ease...but this gives the general idea.

I added the stamped 'Congratulations' in the absence of anything more weddingy, using a corner punch to cut out the notches, mounted it on the card using 3d stickys. I embellished it with a couple of ribbons and left the inside blank for people to write their own messages.