Wednesday, 15 June 2011

Stencil “DAD” card with Silhouette Studio tutorial

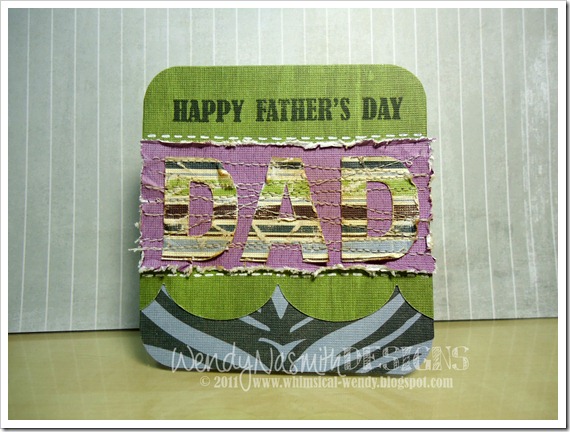
I {heart} my Silhouette machine. Look at those gorgeous crisp cuts on this card. Awe-some-ness!

Silhouette Studio logo (for blog posts)

I’ve made this card using the above software. Please feel free to click on the image to take you straight to the download page of their website. If you have a Silhouette or a CraftRobo machine, you should be able to download and use this software as they are both the same machines, that (for some strange reason) are sold under different names in different countries.

I know I shouldn’t blow my own trumpet, but I really love this card. Its a CAS design that has used some rather feminine papers actually, but it worked out as a great Father’s Day card nonetheless.

Just in case you were wondering, I really don’t like using “male hobbies” as focal points for masculine card designs. Well, at least whenever I try to make a card with a cricketer or fisherman, for example, they end up getting filed under “bin”. It just doesn’t work for me and my particular style. Do you have any tips for designing masculine cards?

Enjoy the video below, which shows you the Silhouette Studio design aspect, as well as putting the card together. Please don’t forget to rate and subscribe to my YT Channel. Also, if you ‘follow’ my Facebook and Twitter pages, then you’ll always know when my next video/blog post is up.

Watch video below | Watch at YouTube

Wednesday, 8 June 2011

How I store my Distress Inks

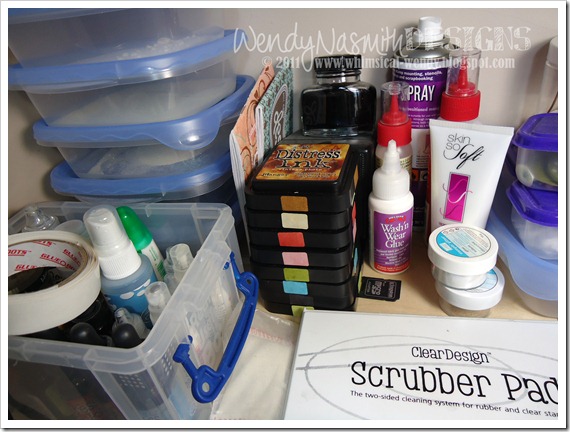
Super quick post today. And you get to see a bit of my craft room – this is the tidy bit, lol!

I get asked a lot how I store my distress inks. I have them in a stack, stored face up (Distress Inks are so juicy, they don’t need to be stored face down like other pads). I simply identify the colour on each side of the pad using a tiny sticker coloured with the ink itself. Very easy, very quick, and saves a whole lotta hassle in the long run, constantly searching for a colour, especially if you have lots of ink pads! Hope it helps you all too =)

Watch video below | Watch at YouTube

Sunday, 5 June 2011

Another Father’s Day card

Father’s Day is really truly only just around the corner now {which means so is my 30th birthday, but hopefully that won’t be too traumatic!!} so here’s another design that you can use to create a nice card for your Dad.

I created this design for a craft day with my friend Katherine, who is more used to working with glass, and has never made a card before and really wanted to give it a go. So I kept it fairly simple, but still, there are quite a few techniques going on in the card. I wanted her to have a good play around with paper techniques!

We also messed around with combining some glass techniques with my paper craft and came up with some really beautiful pieces (sparkly silver swirls on blue fused glass – gorgeous!!). I will have to show you those when I get a picture from her.

Techniques used in this card were die-cutting (lots of), eyelet setting using a crop-a-dile, faux stitching and corner chomping. So the video ended up being 10 minutes long!

Enjoy the video below,and please don’t forget to rate and subscribe to my YT Channel.

Watch video below | Watch at YouTube
Monday, 23 May 2011

Father’s Day card

 The bits I like:

  • I used sewing on this card. Much fun, must do more often =)
  • I used some paper ageing/antiquing methods too.
  • The jumbo scallop Die-namics die cut by My Favorite Things.

The bits I don’t like:

  • Should have left the top two corners square (Put. The. Corner.  Chomper. Down!)
  • Maybe white embossed the sentiment?

But I’m not going to get hung up over these two things that I’d like to change! Enjoy the video, please don’t forget to rate and subscribe to my YT Channel.

Watch video below | Watch at YouTube

Sunday, 15 May 2011

“Hello” card and MFT mini rolled roses tutorial using felt


AN UPDATE…

You might have noticed I have been away from my craft desk. For ages. I’m so sorry. I don’t really know how it happened. I guess life just got too stressy and busy for me all at once and I just hid away for a while, reading lots of books. This is my way of just stepping back from things for a while & recharging my batteries.

The reason: I’m being made redundant at work, and given the current job market in the UK, it’s going to be tough to find a new job that (a) pays enough to pay the bills and (b) be near enough so I don’t have to spend all my hard earned pay on petrol – and at £1.37 per litre (£6.23 for a UK gallon!) the job will have to be pretty close by!

So as a result, I’ve not been feeling very creative. I got crafters block on any new designs. I made some cards that I hated and threw away, frustrated. And then recently, I started coming up with some new designs that I wanted to try out and I was back at my craft desk once again. Phew!

BACK TO THE CARD…

The sentiment is “hello” to say “hi” to you all after being MIA for so long. Thanks for being patient =)

I ordered some of the Die-namics dies from My Favorite Things, which arrived this week (very quickly seeing as they shipped from the USA). They. Are. Awesome.

They cut through felt so well – and there was me thinking they’d struggle, because to be honest, they don’t look like they’d cut through much more than paper. They don’t look fragile as such, just nowhere near as beefy as the dies you get from Sizzix or Provo Craft. But they do exactly the same job, whilst taking up much less room! Thumbs up from me there.

I demonstrate using one of the dies in the video below, the Mini Rolled Roses die, using felt. You will need fabric glue for this. Trust me, I tried with Glossy Accents and TomBow glue and neither worked. They just came apart afterwards. I actually believe a hot glue gun would be the best for this as it would hopefully fuse the materials together and set/dry almost instantly. I don’t have one, so do let me know if you try this with a glue gun. I want to know whether to invest as I’m far too impatient to wait 4 hours for the fabric resin glue to set (I ended up sewing these flower together in the end, just to get the video finished!).

The video is below. It’s a long one! But I do show you a lot =)

Please don’t forget to rate my videos and subscribe to me over at my YT Channel. Also, if you ‘follow’ my Facebook and Twitter pages, then you’ll always know when my next video/blog post is up.

Watch video below | Watch at YouTube