Mom and I got together this weekend for a few days just us girls. Mom is very new to cardmaking, so she asked me to give her a few tips and show her some techniques...so we went to my local craft shop, spent far too much on some lovely craft goodies, and then between us we came up with these designs.....my wonderful talented Mom picks things up quick, don't you think?!?
The 'congrats' was using chipboard stickers, then inked them up with some red ink, poured clear embossing powder over the wet ink, heated it, then stuck the stickers onto the card. Beware when using this technique - the combination of the embossing powder and the heating, usually ends up that the stickiness of the stickers is lost, but that's quickly solved with some glue!
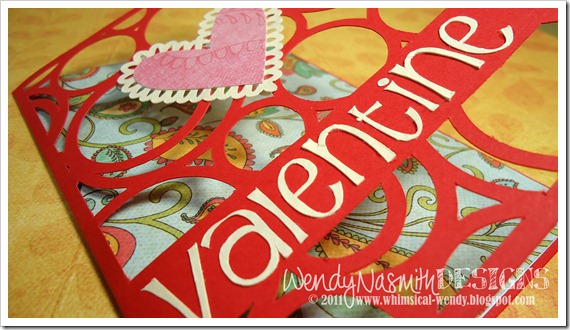
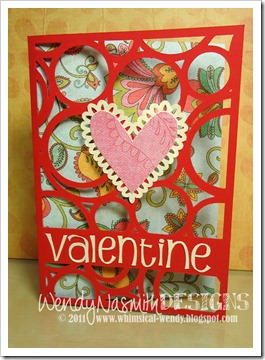
This card is simply demonstrating how you can use a few basic colours, lifted with some patterned paper, to create a really quick and effective card. Mom enjoyed making this - she LOVES those chipboard stickers ;o)
This is a close up of the card below. Mom wanted to have a play with my Cuttlebug, so we took some patterned paper and a really expensive (not!) cereal box and die cut this flower shape then adhered it to the card using a matching brad. If you cut the paper and the cardboard at the same time, you get a really crisp die cut, that you just glue together, giving your patterned paper the strength it needs to be a stand-alone topper. I'm still convinced that the best 'chipboard' you can use in the Cuttlebug is cut up cereal boxes - and it's far cheaper than buying the proper stuff by the sheet!
The stamped image is done by inking up the stamp, stamping it once on a bit of scrap paper, then stamping it onto the card. This gives a more subtle stamp effect - great for building a background with.
I intend on using some of the techniques we used here and doing a couple of videos, but I couldn't do any over at the weekend, cos we had to use my dining room to do our crafting - my craft area is too small for two people.
Well I hope you've enjoyed seeing what me and my mom got up to over the weekend, check back later this week for a video tutorial - I filmed a couple tonight, but I need to edit and publish them to YouTube and that takes a while....


 This design requires the above software. Please feel free to click on the image to take you straight to the download page of their website. If you have a Silhouette or a CraftRobo machine, you should be able to download and use this software as they are both the same machines, that (for some strange reason) are sold under different names in different countries.
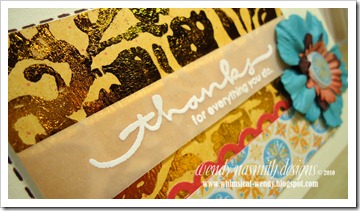 This card used a new technique (well, new to me!) called Hot Foils / Hot Foiling. My wonderful parents bought me some surprise craft stuff for Xmas and this was one of the goodies. I used a stamp set that was part of the same present (thanks M&D! xx). It’s hard to capture in the photos but these foils are GORGEOUS in real life – so shiny and brilliantly metallic. You could never hope to achieve this level of shine with metallic embossing powders, so it’s good that these hot foils are an option.


 I’d been thinking about creating something like this for ages, and then


")


 Wow!
Wow! 
 I also loved Kristina's idea of stapling and folding ribbon as she beautifully demonstrates on her card


