Showing posts with label Stampin' Up. Show all posts

Sunday, 30 October 2011

Kindness comes in many forms…but always from the heart

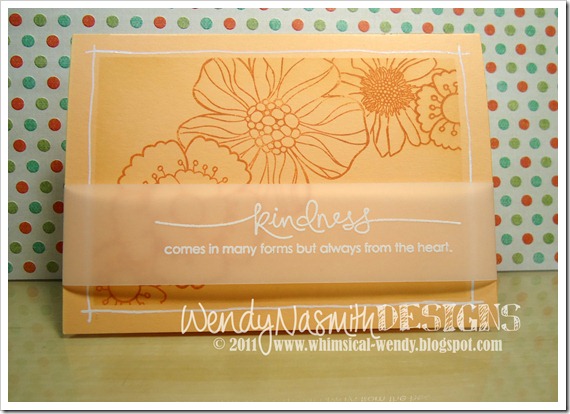
I wanted to make a card using masking techniques with this Blossom Art stamp set by Hero Arts.

This is a really simple technique that gives some beautiful effects. It can really stretch your stamp sets to make them even more versatile, by effectively creating larger ‘background’ stamps out of several smaller ones.

The sentiment stamp is called Heard from the Heart by Stampin’ Up! and I just love all the sentiments in this set.  I use a technique of white embossing on vellum cardstock to give the sentiment added interest without covering up all of the stamping underneath. Kristina Werner uses this technique a lot and it inspired me to try it myself.

As usual, please don’t forget to rate and subscribe to my YT Channel. Also, if you ‘follow’ my Facebook and Twitter pages, then you’ll always know when my next video/blog post is up. Hope you like the video. See you next time!

Saturday, 5 February 2011

May all your wishes come true


I love that this card is all pastel coloured and distressed. It gives such a soft, pleasing look to a card I always think!

I just love these butterflies from Hero Arts. They are just adorable! And they work up really quickly and easily using Distress Inks and an AquaMarker water colour blender pen from Letraset. I had such fun colouring these little beauties. They match perfectly with October Afternoon’s Fly a Kite collection papers. I really can’t get enough of these papers at the moment – just gorgeous!

The sentiment is a stamp from Stampin' Up! which I got through my good friend Monica Gale. There are four sentiments in this set, all in this gorgeous style. I’m going to be using them. A lot. =)

Anyway as usual, the video is below. Please don’t forget to rate my videos and subscribe to me over at my YT Channel. Also, if you ‘follow’ my Facebook and Twitter pages, then you’ll always know when my next video/blog post is up.

Watch video below | Watch at YouTube

Wednesday, 16 June 2010

Happy Father's Day

<Digimax S600 / Kenox S600 / Digimax Cyber 630>
Another Father's Day card for those of you still stuck for ideas for masculine cards. Men are just so darned hard to create cards for, but I actually enjoy the challenge. This card is quite bright and summery, but still retains just enough 'masculinity' to work as a card for a Dad (I hope!).

<Digimax S600 / Kenox S600 / Digimax Cyber 630>
I was initially inspired by this card  and this card by Kristina Werner but I got a little bit over excited when creating my card and forgot to adhere the vellum on before anything else…and once that glue is stuck, there’s no getting it off for love nor money! So I had use another technique for holding the vellum in place on that bottom right corner.

So, working with the design I had in mind, I just used the stickles a little further down the card than I had planned, and ‘glued’ the vellum edge down with a few blobs of stickles.
  <Digimax S600 / Kenox S600 / Digimax Cyber 630>
And because the rainbow polka dot c.s. that I used just below it had glitter blobs on it too, it kind of looks like it’s meant to be falling into the next part of the design. Phew – card saved from the scrap heap!


Below is the video as usual, please don’t forget to head over to my YT Channel to rate & subscribe if you haven’t already! I’m nearly at 1,000 subscribers (!) so I’m super-happy and grateful to you all for your support.

Watch here | Watch over at YouTube

Sunday, 22 November 2009

Angelic Christmas!

<Digimax S600 / Kenox S600 / Digimax Cyber 630>
Well, it’s that time of year again! Every year I say I will make all of my Christmas cards in October, and even get some batches made up to sell, but every year, time gets ahead of me and I end up running around like a mad woman trying to fit everything in!! Work has gone crazy busy at the moment too, so it’s been really difficult to get to my craft desk at all, let alone get some video tutorials done! But I had great fun doing this card, so I really must try to fit some more in this week ;0)

<Digimax S600 / Kenox S600 / Digimax Cyber 630>My little angel was printed onto gesso prepared c.s. which enabled me to hit the ink with clear e.p. before it dried, but unfortunately, the gesso didn’t quite agree with my copic markers. That’s to say, they’re not damaged in any way, but they just didn’t blend as nicely on the gesso as they would’ve on the gel acrylic prepared c.s. So, note to self – only use matte gel medium for preparing c.s. in future, just use gesso for texture!

I just love all the glitter on this card. I’m not usually one for lots of glitter, but Christmas is a great time to really go for it on the glitter…

The video is below. Now, I’ve asked Santa for an HD Camcorder this year (Santa is otherwise known as my Hubby!!) so these videos will potentially be higher quality in the New Year, enabling me to zoom in more on the detail. But for now, I hope this is enough for you to see what I’m doing. Please hop over to my YT Channel to rate and subscribe!

Thanks for watching!

Friday, 27 March 2009

Mother's day cards

I made two of these cards because now I have two mother's; a mom (my mom) and a mum (my husbands' mum). I wanted to use butterflies in the design because they are bang on trend at the moment, but I didn't have a butterfly stamp.....so I made one! 

I also spotted this post for a competition for some blog candy (72 FREE copic markers) so I'm going to use this post as my entry ;-) as I stamped and watercoloured the image (in the absence of copic marker pens!).
I made the butterfly stamp using ImagePac, which is a wonderful way we crafters can make our own stamps at home, simply using this weird gel sachets and a 60W bulb! You pretty much simply choose a design (or draw yourself), print out on transparency, then clamp it between some magnetic plates (supplied with kit) stick it under a desk lamp for a time...then viola! a new stamp has been born! And they really are as good as your standard acrylic stamp, except they're slightly off white (but who cares?).
These Mother's day cards we the simplest cards I could think of in the half hour I had to make them (on the morning before work on the day I posted them). I almost resorted to a shop-bought card (shock!! horror!!) cos I was so strapped for time. But you can't get shop bought for the most important ladies in your life, can you? So they weren't quite as 'finished' as I'd have liked, but then I'm always super-critical about my designs, however thought-out they are (or not). No video, cos my batteries had ran out on my web cam, and I was mega rushed!

Thursday, 12 March 2009

Have a FUN birthday!!


I had no idea about the final design for this card when I started making it, I just felt like winging it...many of my designs I've thought about as I fall asleep at night (typical, cos then you have to fight to remember it, or get up and jot it down!) but this one I just had a go at on the spot creativity,
As I explain in the video, I used these stick on letters, and tried to colour them in with my ink pad, but unfortunately, the stickers were quite shiny, and the ink just didn't dry for ages, despite force-drying them with my heat gun (I couldn't do this for too long cos it would potentially damage its sticking ability). But they dried overnight so it was fine.

So, below is the video, I hope you enjoy it. If you do, please rate it over at YouTube - it's always nice to get some feedback on my work, especially as these videos take quite a while to film and edit, so I want to know if people are getting something useful from them, or suggestions about what you would like to see on future videos! Thanks for watching and reading my blog xx

Monday, 5 January 2009

Flower Birthday card (watercolour)

It's been so long since I made a card I had to restrain myself with this one...so I plugged for a watercolour, which I haven't done in ages. I really love the effect, which I created using Tesco's cheapo 'Go Create' felt tip pens (for kids!), due to the absence of more grown-up pens :-) I scribbled on an acrylic block with each colour, and then painted using a paintbrush as if I was using watercolour paints. For extra definition and shading effects I used the felt tip pen directly on the damp paper.


The paper was just crappy copy paper covered in a couple of coats of gesso, an idea I was first introduced to by Mel at this blog post. It looks like seriously expensive embossed paper (see first photo in close up), and is really nice to work with for very little effort, just a little patience whilst it dries, but if you do a whole stack of this paper at once, you'll always have some to hand. I love how the watercolour 'bleeds' slightly down the grain of the gesso paint. You really don't have to be an artist to do this, in fact keeping between the lines doesn't look as good, hehe.