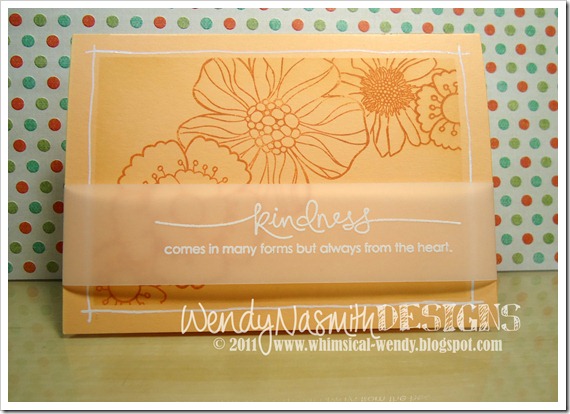
I wanted to make a card using masking techniques with this Blossom Art stamp set by Hero Arts.
This is a really simple technique that gives some beautiful effects. It can really stretch your stamp sets to make them even more versatile, by effectively creating larger ‘background’ stamps out of several smaller ones.
The sentiment stamp is called Heard from the Heart by Stampin’ Up! and I just love all the sentiments in this set. I use a technique of white embossing on vellum cardstock to give the sentiment added interest without covering up all of the stamping underneath. Kristina Werner uses this technique a lot and it inspired me to try it myself.
As usual, please don’t forget to rate and subscribe to my YT Channel. Also, if you ‘follow’ my Facebook and Twitter pages, then you’ll always know when my next video/blog post is up. Hope you like the video. See you next time!
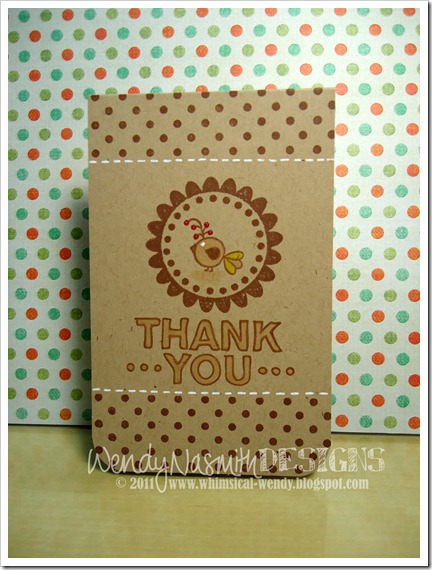
This card has been inspired by a couple of cards by the wonderfully talented Kristina Werner. She did both a Finally Friday card and a Make A Card Monday (MACM) card recently, using the one-layer technique. I saw these cards and I just had to have a go at one myself…
Both Kristina and I have a borderline obsession with Kraft cardstock ;) And the Chestnut Roan ColorBox Chalk Ink really does go so well with it. Also, it didn’t seem to smudge at all when using copic markers over it, which quite surprised me in a very good way!
Enjoy the video below, which shows you how I put the card together, including a few tips I hope you find useful.
Please don’t forget to rate and subscribe to my YT Channel. Also, if you ‘follow’ my Facebook and Twitter pages, then you’ll always know when my next video/blog post is up.
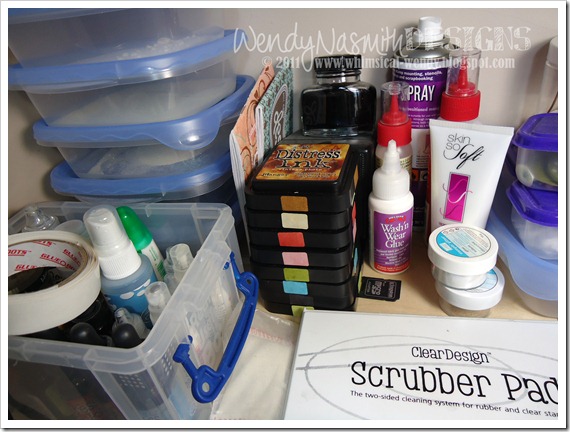
Super quick post today. And you get to see a bit of my craft room – this is the tidy bit, lol!
I get asked a lot how I store my distress inks. I have them in a stack, stored face up (Distress Inks are so juicy, they don’t need to be stored face down like other pads). I simply identify the colour on each side of the pad using a tiny sticker coloured with the ink itself. Very easy, very quick, and saves a whole lotta hassle in the long run, constantly searching for a colour, especially if you have lots of ink pads! Hope it helps you all too =)
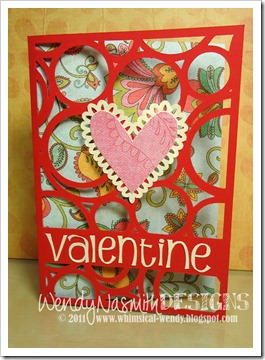
A completely die cut card, designed (pretty much) from scratch using two downloads from the Silhouette Studio website. In the first video, I will walk you through how I did this, and in the second, I’ll show you how I complied the card from all of the die cuts.
This design requires the above software. Please feel free to click on the image to take you straight to the download page of their website. If you have a Silhouette or a CraftRobo machine, you should be able to download and use this software as they are both the same machines, that (for some strange reason) are sold under different names in different countries.
I hope you find the Silhouette Studio software walkthrough useful. I had considered using Illustrator for this, but it is far more complicated than it needs to be for the purposes of this design.
As you can see, the designing only took me 10 minutes from start to finish. It’s only easy when you know how though; hence I hope the tutorial inspires you to be more adventurous with your designing!
Please don’t forget to rate my videos and subscribe to me over at my YT Channel. Also, if you ‘follow’ my Facebook and Twitter pages, then you’ll always know when my next video/blog post is up.
TWO video tutorials for this card. An unexpected bonus for you all! =)
This card used a new technique (well, new to me!) called Hot Foils / Hot Foiling. My wonderful parents bought me some surprise craft stuff for Xmas and this was one of the goodies. I used a stamp set that was part of the same present (thanks M&D! xx). It’s hard to capture in the photos but these foils are GORGEOUS in real life – so shiny and brilliantly metallic. You could never hope to achieve this level of shine with metallic embossing powders, so it’s good that these hot foils are an option.
I also show you two methods of customising your own patterned paper brads. This means that whatever gorgeous patterned papers you have, you can create perfectly coordinated brads to use on your projects. You could use the I-top brad maker by Imaginisce, but this is not widely available (if at all?) in the UK, so I had to come up with a suitable alternative. I hope this idea inspires you to be more creative with your products!
Something a little different today! This is really not my usual style of Christmas card – mainly because this one is unsuitable to be made in bulk. I’m doing a one-off (for once!).
There just isn’t enough patterned paper in the paper pack to create more than a few of this exact design. But that’s ok; it makes a nice change to make a singular card, rather than having to think up a design that can be replicated in bulk.
I like every part of this card except the glossy accents on the “Wishes” word. The ink underneath the glossy accents smudged during the drying process. I should’ve realised that this would happen, using distress inks, it was inevitable, but I thought I’d risk it…and lost. But it doesn’t look too bad I guess. I’m just going to pretend it was meant to look like that, although for future reference, I will only use chalk inks or StazOn inks for applying glossy accents to! Lol!
I’m super pleased with how the snowflakes have turned out. These are my own design that I’ve made into stamps using the ImagePac stamp kit. I’ve also created a slightly larger version of the stamp to use as a die cut. So I can die cut loads of the snowflakes in advance, and then stamp straight onto the cut-out. This then saves me having to cut out very intricate shapes by hand – and looks a lot more crisp and professional. And you don’t get RSI from cutting out loads of shapes =)
The video is below as usual. Hope you enjoy! Don’t forget to comment and subscribe at my YT Channel, and to join my Facebook group for my blog and YouTube updates. Have a great day!
Today’s video is for something a bit different. I got fed up of having all my card designs/sketches all on random post-it notes or scrap bits of paper all over the place, so I decided to create a little booklet that I can take with me wherever I go, to jot down the designs whenever I get them. Which can be at absolutely any random time or place, let me assure you! LOL! I’d been thinking about creating something like this for ages, and then Kristina Werner created something similar for herself, which gave me the incentive to stop being lazy and get to it! Kristina’s design wasn’t quite what I had in mind, nor did it make best use of the A4 paper size we have here in the UK, so I took the plunge and designed my own. Click here for the PDF of my inserts (from A4 paper).
Both booklets have ‘flat’ designs on the front cover, so when you’re doodling on the inside left-hand pages, you’re not drawing over the lumps and bumps of 3d design work on the cover. Also, this booklet will be travelling about in my handbag a lot, therefore, it needs to be durable! I have also considered covering the whole cover in sticky plastic to give that extra durability.
Below is the video and as usual, please view it in HQ (click on the button in the bottom right-hand corner) and go over to my YT channel to rate & subscribe! Thanks for watching! ;0)
I spent quite a lot of time on this card as it was for a very special friend. I specifically didn’t video it, as I wanted to play about with my new distress inks and not have a camera above me watching every move I made. I quite enjoyed not having the distraction – it was nice to just go to my craft room and craft! Total enjoyment…
And I really did have loads of fun making this card. It’s one of my most favourite cards that I’ve made of late! The background started out as a plain sheet of white card and I just built up the pattern with clear e.p and distress inks. Same with the ‘30’ topper.
The flower I made from scratch from a 6” strip of patterned paper. The pink strip was a pattered piece of paper I added to using distress inks and white gen pen doodling.
We had a great day celebrating Liz’s birthday with her – loadsa love to you Liz!! xx
I had done a video for this card…but it’s never made it to the editing stage. But I figured I can’t make a video for every card I create – there’s just not enough time! So I will just talk you through what I did instead.
This area of the card has been embossed with a cuttlebug folder, but I added a twist. Before placing the patterned paper into the folder, I rubbed one side of the folder with some versamark ink. This ensured that all of the none embossed bits (i.e. not the raised stuff) got inked, meaning that when I took it out of the cuttlebug I could hit it with some clear e.p and heat emboss it. The overall effect was that the depressed bits looked almost wet where the e.p had ‘pooled’. You could increase this effect by using UTEE.
I then cut this to size, added another contrasting piece of patterned paper from the same paper stack and stuck to the base card, inking in orange around the top patterned paper. I tied a thick piece of ribbon around the join and tied it off the edge of the card using string.
The sentiment was a combination of chipboard letters and white gel pen handwriting on card cut using the Labels1 Nestibilities dies, adhered to another slightly larger label from the same set and mounted onto the card using 3d foam stickers. The addition of 3 green eyelets to balance the card and the card is complete.
Today's card is a VERY masculine card. It's for my brother who celebrated his 32nd birthday this week. He's really into all things metal - he's always tinkering with cars in the garage and he likes everything to be 'just so' - hence the card I've created for him is very balanced/symmetrical, very metallic and no-frills. It's not necessarily my kind of card (if I'm truly honest, it's really not my thing!) but it just know he'll love it. I hope you will like it too, but I understand if you don't as this is not everyone's cup of tea ;0)
The card incorporates real metal, from a Pepsi can I (very carefully!) cut up, flattened, punched out several squares and cuttlebugged using the Swiss Dots embossing folder. I've used thin chipboard squares to create a chess board effect alongside the metal squares. I stapled the chipboard squares in a cross just to add to the metal theme. I then had to run these through the Cuttlebug to flatten the staples to allow me to adhere them down to the project. I did this by stacking my A plate, an embossing folder (with nothing inside it - this is just to pad out the stack), then a B plate (embossing plate), a piece of card to cushion the staples and a final B plate (cutting plate).
Sounds complicated, but essentially all I've done is create a stack thick enough to compress the staples, without causing damage to my machine ;0) You may need to vary this stack as each machine may differ. DON'T FORCE your machine, just remove a layer of c.s. if it's too difficult to turn the handle.
The sentiment part of the card uses a Fun Doodle Tags stamp set from MyGrafico.com (no longer available from MG, the link to the designer's website, Pixels&IceCream, can be found here). I just *HEART* this stamp set! It has so many uses! I'm always flapping around trying to find something suitable to stamp my sentiment onto, so this a great stamp set that's a must-have for everyone's crafting stash. And don't forget, as it's digital, you can resize any of the 8 tags to fit any width of sentiment, and therefore to suit any project - so that makes it great for scrapbooking too.
So, the video is below. I hope you enjoy watching me make this card - if you do, please hop over to YT to rate and subscribe. Your comments are always appreciated and I hope it inspires you to be ever more creative with those pesky masculine cards!! ;0)
Hi – I just wanted to share with you my eagerly awaited “Miss Anya” stamps and I thought I’d film the process of me cutting them out as a quick tutorial for you all. They don’t come with instructions on how to prepare the stamps, so I thought it’d be a great opportunity to show you how I recommend you do it… This is a popular new way of selling rubber stamps to save on precious craft storage/space, so it's important we know how to prepare them for the best stamping experience!! This technique uses stamps that come prepared on mounting foam such as 'EZ Mount', which is perfect for temporarily adhering to acrylic blocks in a similar way that acrylic stamps do. If your stamps just come as just the rubber, you can easily adhere them to something like EZ Mount then follow this same process. DO NOT CUT OUT your rubber stamps until they are fully adhered to some sort of mounting foam such as EZ Mount. Trust me, you’ll be in a world of pain if you do… I hope you find this tutorial informative - please pop over to my YT channel to rate & subscribe. Thanks for watching!
So here is the card I hinted at yesterday! An exceptionally quick card to put together, with lovely rich summery colours…the weather here isn’t being very obliging, so I’m putting some sunshine in my craft room instead ;0)
Using pre-cut decoupage flowers, I’ll show you how to build the flower, and use the discarded cut-out shape to create your own background on your base card. This is a super-fast card, and super effective, especially when you consider how easy it is to create and achieve this effect!
The flower papers I used are medium weight – just perfect for being strong enough not to tear and malleable enough to be teased into the shape you want. These papers are (unusually!) UK only papers, but I’m sure there are other just as delectable papers out there in other countries for you to try this technique.
The video below is shorter than normal, reflecting how quick this card was to create. I hope you enjoy watching this, and would love to hear any comments or questions that you may have. If you nip over to YouTube you can subscribe to my channel and rate the video to let other’s know what you thought of it.
Hi! No video tutorial today I'm afraid...I wanted to get my first copic marker card up on this blog so I was in with a chance of winning copic markers - THE MOST FANTASTIC blog candy ever!! Whoever wins this will be soooo lucky, cos copic markers are just awesome....I've put off buying some for ages, cos they're so expensive and I thought "You know, what's all the fuss about" so I ordered a couple from Click on Crafts (£1.99 each plus £1.50 postage for 8 of the little beauties).
And I'm so glad I did....it was so much fun playing around with these things; why oh why didn't I get some before?? I am now an official worshipper of these beauties.....still wish they were cheaper, but hey, a gals gotta treat herself occasionally, right?
I'll be back later in the week to show a similar card to demonstrate this copic marker technique using digital stamps. For some absolutely gorgeous digital stamping techniques, hop over to Mel's blog - she really is the Queen of Digi stamping techniques ;0)
I wanted to make a wedding card with a BIG flower on it. So I made one that nearly didn't fit in the envelope it was so big!!!
Seriously, I've made this with some leftover tissue paper in bright pink. It's a really simple process explained in detail in the video below, but essentially, it's loads of circles (in two different sizes) scrunched up, then held together with a brad. I have embossed a pattern onto the tissue paper before assembling it, but this is completely optional. It's hard to see in the photo's but in real life it adds a nice 'twinkle' to the flower.
I originally wanted to use a rub on in the circle cut out on the right, but unfortunately, the rub on refused to rub onto the paper...so much so that I trashed the base card by rubbing so hard I practically embossed a hole in the card! But it was fortunate, cos in the end I preferred the kraft coloured base card!
...and no faux stitching! This must be a record for me! ;0)
Anyway, please have a look at the video below. I hope it inspires you to make a tissue paper flower, cos they're so quick and so much fun. This idea was my own take on a combination of a few ideas I've seen on blogs recently - there are some really good recycling ideas out there at the moment!
As usual, please click on the HQ button in the corner of the video after pressing play, this will give you a much better quality viewing. Please hop over to YouTube to rate & subscribe, and leave a comment over there or on my blog. Thanks for watching! ;0)
Well, I fancied a bit of a change with this card...so I drew a scallop/cloud effect on the top of the front of the card and cut around it. To emphasise this, I doodled a border all around the edge of the card, using a repeat pattern of circle-dash-circle-dash just to have some variation on the usual faux stitching I favour.
The 'baby' stamp was done using a super cheap stamp set I picked up from a seaside bucket and spade shop of all places, for only £2! Even on holiday I'm looking for a crafting bargain ;0)
I also tried to make a faux button, simply using a circle punch out of a bit of pink card, and several layers of ultra thick embossing powder (UTEE). I really liked this effect, but when I do this again, I will definitely do some dry embossing on the card to begin with to make the starting piece have a more '3d' effect like a button normally does. I'd do this by debossing a slightly smaller circle in the centre of the button, just outside of the two punched holes. I'll be trying this soon and show it on video so you can get a better idea - it's really hard to explain without pictures/video!
Here is a close up of the 'button' - trust me, it looks better in real life, and it was worth doing, cos it was a lot of fun to play about with!
Below as usual is the video tutorial. Don't forget to watch it in high quality (press play and click on the 'HQ' button in the right hand corner of the video). Please head over to YouTube to rate and subscribe. I love hearing from you guys, so feel free to email me with any requests/comments/questions either below or over at YT. Thanks for watching! ;0)
Have you ever wondered where sequins come from? Answer: From a sheet of brightly coloured foil/metal, machine punched out in a repeated dot pattern. This punch-out is then sold on as ribbon. This is recycling at its best and is cheap as chips ;0)
So I was looking at this stuff (which isn't very inspiring to say the least), trying to think of a use for it on a card that wouldn't look too gaudy, and it got me thinking. So I had a bit of a play and came up with the border for this card. It was double the fun, cos I got to use spray paint and play like a kid, and I got a nice chocolate brown coloured bit of sequin punch-out that I can use on another project too!
This project is simple, because that's the way I like it. I am making no more excuses - I don't 'do' faffy cards, my style is definitely simple: I like 'em simple! A big 'prima' style flower, a funky label-type design cut out and stamped for the sentiment, border at the bottom then a ribbon to finish. And, as I finally got the editing done on the video, and got the thing published (pat on back for me), here it is below. Don't forget to click on the HQ button in the bottom right hand corner after pressing play. It really does make all the difference seeing it in higher quality.
Don't forget to hop over to YouTube and rate & subscribe!! Thanks so much for watching!
Mom and I got together this weekend for a few days just us girls. Mom is very new to cardmaking, so she asked me to give her a few tips and show her some techniques...so we went to my local craft shop, spent far too much on some lovely craft goodies, and then between us we came up with these designs.....my wonderful talented Mom picks things up quick, don't you think?!?
The 'congrats' was using chipboard stickers, then inked them up with some red ink, poured clear embossing powder over the wet ink, heated it, then stuck the stickers onto the card. Beware when using this technique - the combination of the embossing powder and the heating, usually ends up that the stickiness of the stickers is lost, but that's quickly solved with some glue!
This card is simply demonstrating how you can use a few basic colours, lifted with some patterned paper, to create a really quick and effective card. Mom enjoyed making this - she LOVES those chipboard stickers ;o)
This is a close up of the card below. Mom wanted to have a play with my Cuttlebug, so we took some patterned paper and a really expensive (not!) cereal box and die cut this flower shape then adhered it to the card using a matching brad. If you cut the paper and the cardboard at the same time, you get a really crisp die cut, that you just glue together, giving your patterned paper the strength it needs to be a stand-alone topper. I'm still convinced that the best 'chipboard' you can use in the Cuttlebug is cut up cereal boxes - and it's far cheaper than buying the proper stuff by the sheet!
The stamped image is done by inking up the stamp, stamping it once on a bit of scrap paper, then stamping it onto the card. This gives a more subtle stamp effect - great for building a background with.
I intend on using some of the techniques we used here and doing a couple of videos, but I couldn't do any over at the weekend, cos we had to use my dining room to do our crafting - my craft area is too small for two people.
Well I hope you've enjoyed seeing what me and my mom got up to over the weekend, check back later this week for a video tutorial - I filmed a couple tonight, but I need to edit and publish them to YouTube and that takes a while....
Well, we all know how hard masculine cards are to make, so I took a bit of time to think about what would look good as a card for a man, but still be pleasing enough on the eye for me to enjoy making ;-)
I decided that a simple, classic design is what I needed - a no frills man-card!! I've always found it really frustrating that us cardmakers have to resort to sport/hobby images to make a card for the men in our life. Whereas for women, we just do something 'pretty' but with a sentiment to show what it's all about. So I thought I'd apply the same logic and just go for something 'handsome'...
Easier said than done though, because most of my craft stash is tailored toward the feminine market, but this is what I landed on (after about 5 trial cards centred around a similar theme). Here's the video tutorial for you to have a look to see how it was made - ENJOY!
My lovely bridesmaids took me on a wonderful Hen Weekend to a Spa set on a pretty lake area in Cirencester at the end of June. We had such a fantastic time, relaxing, drinking and being merry! They cooked up some real treats for me that made the weekend so special - a lovely photo album of me from a baby (some embarrassing photos there!!) until I met Scott, then some great photos of me and Scott after we met until this point now! And there was the Mr & Mrs game, where they asked Scott loads of questions about him and about me, and recorded his answers on a DVD, then saw how I scored against his answers (we actually did scarily well) but it was all so much fun and so special. I know a lot of effort went in to making the weekend a success, and it was worth every minute!
So I had to thank these lovely ladies, and what better than to thank them with a handmade card?!?
For this, I used a new technique I read about on Mel Stampz blogspot, using crayons with the Cuttlebug embossing folders. Good old crayons - I'd not used these since I was a kid! So basically, I ran some white card through the bug, using the Floral Fantasy folder. I then rubbed over the card (still in the folder to support the raised embossing) using a white crayon. I then washed over the whole card in a black dye ink wash, fairly strong, as it dries a lot less dark than when you first apply it. I then waited for this to dry. You can force dry it with a heat tool, but I found this didn't come out so well, so PATIENCE is needed!!
I then did a similar thing using black card for the strip across, adding some faux stitching using a piercing tool and a white gel pen. I also doodled around the floral embossed pattern to give it a bit more pop, but you could use a white wash after the crayoning if you wish. For the top strip, I used white card and simply washed it with the black dye ink wash that I'd used for the embossed main panel. I then stamped and white embossed the sentiment and put the card together. However, I would recommend stamping the sentiment before adding the faux stitching as the gel pen will also attract the embossing powder and it can get a little fiddly/messy.
I added some gem accents, and a bit of sparkly glitter to give it a bit more oomph, then stuck a white insert in to write my gushing thanks and praise...
My intention is to upload a video on this technique. I have done it, I just need to edit it, and as this is the first one I've ever done, there is a lot of trial and error, but I will get it done soon!
Monday, 16 June 2008
This card was made for a special friend. I had been brewing this design for some time, but after my upgrade to Vista, my ancient old scanner finally gave up the ghost. So, I saved up for a new one, and could start scanning in designs and playing around with images again.
I stamped some scribbly flower backgrounds onto some white paper, scanned them in and shrinked them down, then printed them out on bright pink paper for the main topper. I then went over each individual flower with my glue pen and black embossed each image.
The lighter pink background is clear stamped & embossed, however, when I do this card again, I'll white emboss it instead for more definition that's still subtle.
The stamped sentiment is from the Friendship Blossoms See-D's stamp set. I really like the sentiments in this set, but the flowers aren't much cop!
The box I developed from an idea from this tutorial and tied into the card by using the pinks and blacks and the scribbly flower stamp by Anita. next time I make a box like this, I will make more of the topper on the lid and make it 3d, but I didn't have a whole lot of time as life is quite busy at the moment.


 This design requires the above software. Please feel free to click on the image to take you straight to the download page of their website. If you have a Silhouette or a CraftRobo machine, you should be able to download and use this software as they are both the same machines, that (for some strange reason) are sold under different names in different countries.
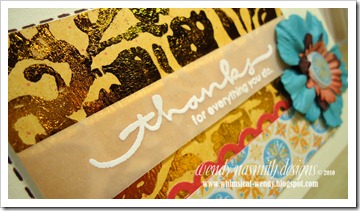 This card used a new technique (well, new to me!) called Hot Foils / Hot Foiling. My wonderful parents bought me some surprise craft stuff for Xmas and this was one of the goodies. I used a stamp set that was part of the same present (thanks M&D! xx). It’s hard to capture in the photos but these foils are GORGEOUS in real life – so shiny and brilliantly metallic. You could never hope to achieve this level of shine with metallic embossing powders, so it’s good that these hot foils are an option.


 I’d been thinking about creating something like this for ages, and then


