It’s been too long since I’ve been at my craft desk. And as this was a request for a bereavement card, I wanted to break myself back in gently. So, no video, and I’ve totally copied an earlier design of mine to make this a super quick card to get myself back into crafting.
There is a video on the earlier post that shows you how to create this design though, so if any of you want to check that out, it’s right here.
This card is not totally the same of course – I’ve changed the colour scheme and the sentiment, plus I’ve added some colouring to the stamping to bring out the design to be a richer effect.
I also created this on Kraft cardstock, which is my go-to c.s. if I’ve been away from my craft desk for ages, as it’s so forgiving, whatever design you choose to apply to it.
Hope you like it! I liked it so much I made two… one to give away and one to keep, lol!
What a busy few months I’ve had! I’ve not even started my Christmas shopping, let alone handmade all my Christmas cards this year :-( But I knew you all deserved to get at least one Christmas card video before Christmas, so here you are!
[I’ve made this card using the above software. Please feel free to click on the image to take you straight to the download page of their website. If you have a Silhouette or a CraftRobo machine, you should be able to download and use this software as they are both the same machines, that (for some strange reason) are sold under different names in different countries.]
I made this card to be bright and cheerful. That’s what Christmas should be all about, so I chose some non-traditional pinks and greens, and hand coloured the trees on the inside of the card.
At the moment, I’m all about the weird and wonderful shaped cards, and this one is no exception as I’ve cut three frames into the front of the card and stamped the Christmas tree images straight onto the inside of the card.
I loved making this card. I hope you love watching me create it – all from the comfort of my new home, and new craft area(!). My life has been in such upheaval and I’ve been packed up in boxes for so long now, I’m so pleased to be crafting again. It’s a shame I missed out on the big run up to Christmas, and doing lots of Christmas videos for you all, but sometimes life doesn’t work out so neatly for you, does it?
There’s two video’s below; one is the designing of the card in Silhouette Studio, the second puts the card together at my craft desk. Enjoy!
I wanted to make a card using masking techniques with this Blossom Art stamp set by Hero Arts.
This is a really simple technique that gives some beautiful effects. It can really stretch your stamp sets to make them even more versatile, by effectively creating larger ‘background’ stamps out of several smaller ones.
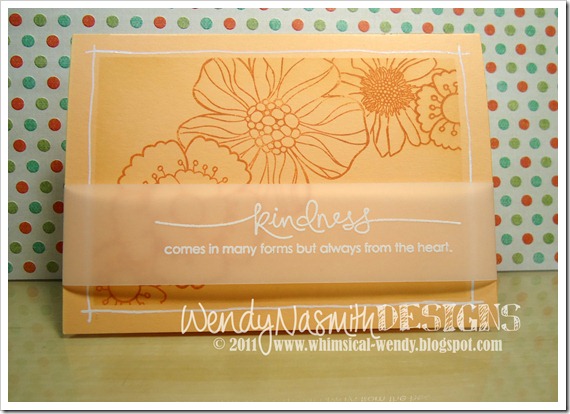
The sentiment stamp is called Heard from the Heart by Stampin’ Up! and I just love all the sentiments in this set. I use a technique of white embossing on vellum cardstock to give the sentiment added interest without covering up all of the stamping underneath. Kristina Werner uses this technique a lot and it inspired me to try it myself.
As usual, please don’t forget to rate and subscribe to my YT Channel. Also, if you ‘follow’ my Facebook and Twitter pages, then you’ll always know when my next video/blog post is up. Hope you like the video. See you next time!
My friend’s dad recently passed away. Such sad news, even though it was expected, it’s still just awful for him. Sympathy cards are always toughies. My rule; make them simple and not with too much…well not too much anything really.
I totally feel a sympathy card should always be more about the words said on the inside, rather than too much fanciness on the outside. These cards are going to be treasured for the thoughts you write inside rather than how pretty the outside is!
That doesn’t mean they can’t portray your personality, I just think it’s an occasion when it needs toning down a smidge…
My friend has just become an Uncle for the first time. He wanted something pretty and pink and cute. I hope I met his brief =)
I used the Life is Good collection by Echo Park. I don’t use this pack enough – I just love these papers! The designs are just so gorgeous.
My card design was inspired by these recent cards of mine; the glittery Mother’s Day card, the stencilled Father’s day card and the ele-phantastic card. I used an element from each of these very different cards to create this new baby one. And you know what? I love it.
[Note: You can check out my videos at my YT Channel for the first two cards to learn how to make this one.]
Don’t you just love this Baby Giraffe stamp by Imaginisce? The actual stamp is smaller than this image but I needed it to be much larger as the focal point for the card, so I stamped it, scanned it in, and made it bigger in Photoshop, then quickly clear embossed the printed image before the ink dried.
The guy I made this card for wanted it to reflect the new Dad’s career (police force) so I included the checkerboard police logo as the background focal. This is why I needed the giraffe to be so much bigger – to tone down the very striking checkerboard effect of the logo! The shooting star is to incorporate the baby’s brother whose name is ‘Cosmo’. Cute name, huh?
Then I just inked the Basic Grey White Chocolate Chip micro stickers with some pink chalk ink, stamped a sentiment from Woodware’sJane’s Script stamp set, and the card was complete!
I thought it was time to do another Silhouette Studio video tutorial!
[I’ve made this card using the above software. Please feel free to click on the image to take you straight to the download page of their website. If you have a Silhouette or a CraftRobo machine, you should be able to download and use this software as they are both the same machines, that (for some strange reason) are sold under different names in different countries.]
I love the colours in this card. This paper stack is definitely one I’ll be using again! I could’ve chosen so many other beautiful papers from this stack – spoilt for choice. I think MME are my favourite paper company in terms of their gorgeous designs. Lush!
There’s two video’s below; one is the designing of the card in Silhouette Studio, the second puts the card together at my craft desk. Enjoy!
This card has been inspired by a couple of cards by the wonderfully talented Kristina Werner. She did both a Finally Friday card and a Make A Card Monday (MACM) card recently, using the one-layer technique. I saw these cards and I just had to have a go at one myself…
Both Kristina and I have a borderline obsession with Kraft cardstock ;) And the Chestnut Roan ColorBox Chalk Ink really does go so well with it. Also, it didn’t seem to smudge at all when using copic markers over it, which quite surprised me in a very good way!
Enjoy the video below, which shows you how I put the card together, including a few tips I hope you find useful.
Please don’t forget to rate and subscribe to my YT Channel. Also, if you ‘follow’ my Facebook and Twitter pages, then you’ll always know when my next video/blog post is up.
I made a few wedding cards recently. I wanted them to be a little different to the usual slushy cards that are sometimes a bit ‘twee’ for my liking.
And these are bold, bright, and very cheerful! Perfect for weddings.
There’s a lot of detail going on here. But I love the rich colours, especially on the red card, which is my favourite. These cards are accented with perfect pearls and just doodled with a white gel pen. The gold glitter blings it up to really get into the extravagance of the day!
I also very much love the sentiments. Hero Arts are great at coming up with just the right sentiment.
The other card I did was similar to the red one, but with a different colour scheme, and without the background stamp.
No video today. It was my 30th birthday yesterday, so I’ve not been at my craft desk for a good few days - I’ve been celebrating with family & friends! Back soon with a video tutorial for a thank you card though – gotta thank folks for all their lovely thoughtful gifts ;)
Should have left the top two corners square (Put. The. Corner. Chomper. Down!)
Maybe white embossed the sentiment?
But I’m not going to get hung up over these two things that I’d like to change! Enjoy the video, please don’t forget to rate and subscribe to my YT Channel.
You might have noticed I have been away from my craft desk. For ages. I’m so sorry. I don’t really know how it happened. I guess life just got too stressy and busy for me all at once and I just hid away for a while, reading lots of books. This is my way of just stepping back from things for a while & recharging my batteries.
The reason: I’m being made redundant at work, and given the current job market in the UK, it’s going to be tough to find a new job that (a) pays enough to pay the bills and (b) be near enough so I don’t have to spend all my hard earned pay on petrol – and at £1.37 per litre (£6.23 for a UK gallon!) the job will have to be pretty close by!
So as a result, I’ve not been feeling very creative. I got crafters block on any new designs. I made some cards that I hated and threw away, frustrated. And then recently, I started coming up with some new designs that I wanted to try out and I was back at my craft desk once again. Phew!
BACK TO THE CARD…
The sentiment is “hello” to say “hi” to you all after being MIA for so long. Thanks for being patient =)
I ordered some of the Die-namics dies from My Favorite Things, which arrived this week (very quickly seeing as they shipped from the USA). They. Are. Awesome.
They cut through felt so well – and there was me thinking they’d struggle, because to be honest, they don’t look like they’d cut through much more than paper. They don’t look fragile as such, just nowhere near as beefy as the dies you get from Sizzix or Provo Craft. But they do exactly the same job, whilst taking up much less room! Thumbs up from me there.
I demonstrate using one of the dies in the video below, the Mini Rolled Roses die, using felt. You will need fabric glue for this. Trust me, I tried with Glossy Accents and TomBow glue and neither worked. They just came apart afterwards. I actually believe a hot glue gun would be the best for this as it would hopefully fuse the materials together and set/dry almost instantly. I don’t have one, so do let me know if you try this with a glue gun. I want to know whether to invest as I’m far too impatient to wait 4 hours for the fabric resin glue to set (I ended up sewing these flower together in the end, just to get the video finished!).
The video is below. It’s a long one! But I do show you a lot =)
Please don’t forget to rate my videos and subscribe to me over at my YT Channel. Also, if you ‘follow’ my Facebook and Twitter pages, then you’ll always know when my next video/blog post is up.
Some of my longer-time fans may recognise the top of this card from this post…
…but I loved this design so much, I decided to make it into a Mother’s Day card for this year. All you need to do is change the sentiment, and “ta-dah!” you have a great Mother’s Day card ready to go.
I keep several cards like this without a sentiment already stamped, so that if I’m stuck for an emergency card, I can whip out just one stamp and I have an instant card that doesn’t look at all rushed. Sneaky but perfect!
This card is available at my Folksy and Etsy shops and I do post them out within 24hrs of your order so you can be sure to get it in time for Mother’s Day. Any support is very much appreciated ;)
As I’ve been super busy putting in my new bathroom (which seems to be taking forever) as well as working full time, I don’t have a new video this week. Sorry, I’m just trying to do too much at the minute, but I am re-linking the video below that shows this card but with a Happy Birthday sentiment to tide you over in the meantime. I’m hoping to film my second Mother’s Day card design tomorrow night, so the video should be up in a few days. Thanks for your patience!
I dreamt this card, then woke up, drew an elephant (!), made the stamps and produced the card. Sounds so easy…but I did have a very definite design in my head, and no stamps to achieve it, so this was the only way.
I even painted the nails of the elephants using Liquid Pearls in White Opal. Maybe a little bit obsessive?!?
The parquet design stamp was inspired by, well, parquet flooring (unsurprisingly). And I have taken a leaf out of the very amazing PapertreyInk’s book and made sure that the stamp I designed was ‘repeatable’ like their background stamps are. And you know what? It worked a treat =)
The elephant was just drawn with the help of my seriously awesome Wacom Bamboo Graphics tablet that Sarah recommended to me way back when and that I now cannot live without. I just can’t use a mouse properly anymore! A graphics tablet is just so much more sensible and easier to control when drawing on the computer.
Incidentally, the card is for my friend, Anna, who is crazy mad about elephants and all things zoo. Happy Birthday to you! =)
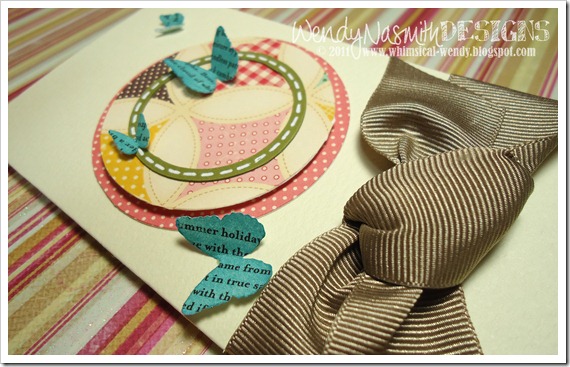
I love that this card is all pastel coloured and distressed. It gives such a soft, pleasing look to a card I always think!
I just love these butterflies from Hero Arts. They are just adorable! And they work up really quickly and easily using Distress Inks and an AquaMarker water colour blender pen from Letraset. I had such fun colouring these little beauties. They match perfectly with October Afternoon’s Fly a Kite collection papers. I really can’t get enough of these papers at the moment – just gorgeous!
The sentiment is a stamp from Stampin' Up! which I got through my good friend Monica Gale. There are four sentiments in this set, all in this gorgeous style. I’m going to be using them. A lot. =)
Anyway as usual, the video is below. Please don’t forget to rate my videos and subscribe to me over at my YT Channel. Also, if you ‘follow’ my Facebook and Twitter pages, then you’ll always know when my next video/blog post is up.
Something a little different today! This is really not my usual style of Christmas card – mainly because this one is unsuitable to be made in bulk. I’m doing a one-off (for once!).
There just isn’t enough patterned paper in the paper pack to create more than a few of this exact design. But that’s ok; it makes a nice change to make a singular card, rather than having to think up a design that can be replicated in bulk.
I like every part of this card except the glossy accents on the “Wishes” word. The ink underneath the glossy accents smudged during the drying process. I should’ve realised that this would happen, using distress inks, it was inevitable, but I thought I’d risk it…and lost. But it doesn’t look too bad I guess. I’m just going to pretend it was meant to look like that, although for future reference, I will only use chalk inks or StazOn inks for applying glossy accents to! Lol!
I’m super pleased with how the snowflakes have turned out. These are my own design that I’ve made into stamps using the ImagePac stamp kit. I’ve also created a slightly larger version of the stamp to use as a die cut. So I can die cut loads of the snowflakes in advance, and then stamp straight onto the cut-out. This then saves me having to cut out very intricate shapes by hand – and looks a lot more crisp and professional. And you don’t get RSI from cutting out loads of shapes =)
The video is below as usual. Hope you enjoy! Don’t forget to comment and subscribe at my YT Channel, and to join my Facebook group for my blog and YouTube updates. Have a great day!
Just wanted to show you a card I made for my friend’s birthday. I didn’t record it at the time, so I made another for y’all and videoed that one. It’s below. Enjoy!
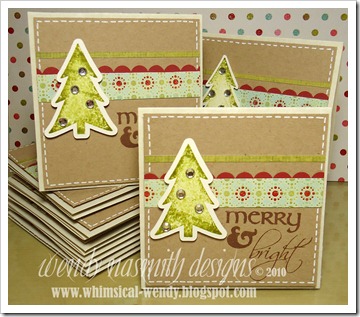
This is the second in my Christmas card series for 2010. It uses very little in the way of supplies – pick one focal stamp, one sentiment stamp, 1 sheet of repetitive patterned paper cut into strips, another plain paper cut into very thin strips, some gems and a scalloped border punched contrasting cardstock. Perfect for making mega bulk-batches of Christmas cards!
As you can see from this photo, I’ve already made quite a few…
…so if you want to get a head start on your Christmas card shopping this year, you can head over to my Folksy shop to grab a pack. I’m selling them in packs of 5. This is a super-cheerful card, just right for this time of year, and perfect for Christmas. They are approx. 4” x 4” in size, and of course, I’ll send you 5 envelopes too =)
The video below shows how I made the card, but I also give you some tips on bulk-making cards, great for this time of year, when if you’re anything like me, you’ve got loads of Christmas cards to make!
Super late in sharing this one with you guys. I was going through some of my old card photos and spotted this one and couldn’t remember ever blogging about it. So I’m doing it now!
I used this gorgeous flocked paper pack from GCD Studios called Paris Nights – scrumptious! The card was for my parent’s wedding anniversary this August just gone. And the reason I didn’t share it, was because I made it in such a rush before heading off to Australia, that blogging it was the last thing on my mind.
So no video tonight…but instead I’m trying to make and share more cards with you all more regularly, even if I don’t have time for a video post. I find myself sometimes NOT crafting because I felt I always have to record my work. And sometimes I just don’t feel like it; I just want to craft in my own sweet time!
However, that said, I recorded a video today for the cutest little card I’ve made in a long time, so I hope to have that up by mid-week, if not sooner…sneak peak tomorrow! =)
It’s (kind of!) that time of year again, so I thought I’d get ahead of the game and get one of my many Christmas cards done.
I’ve used the same paper pack as I did last year, as there are so many lovely papers still left – and they’re just as beautiful as ever!! It’s called Winter Wonderland by My Mind’s Eye. I’m not sure if you can get these particular papers this year, but there’s bound to be similar (& just as gorgeous) Christmas themed papers out there for this winter season.
Don’t make the mistake I did and heat emboss your vellum for too long – it went a bit wrinkly, but I’m not precious and didn’t bother to change it. Life’s too short, right?
As for the sentiment, this is a stamp I designed myself. I’m thinking of putting a couple of my stamp designs in my Folksy shop – so please leave a comment if you would be interested in me selling these. I just want to see if it would be a worthwhile venture to help fund my video blogging. I’ve just purchased a v. expensive new camcorder, because I had loads of comments about my videos ‘focus-hunting’ (kind of zooming in and out of my craft desk) which was making people kinda dizzy…so no more of that, yay…but all of this costs more than I have, so ways of subsidising this would be helpful for the old craft purse =)
As usual, the video is below. If you enjoy, please head over to my YT Channel to rate & subscribe. You can also follow me to get my latest blog updates by clicking on the “Follow” link on the right hand side of my blog and also via Facebook, where I have an artist’s page for all my crafty updates.
This card is for the lady we stayed with on our recent holiday to Australia. We stayed with her for a week during our time there, so I thought it would be nice to show our appreciation by sending her a thank you card! I also made another one for my in-laws, who were generous enough to take us with them on their holiday. I have the best in-laws ever!!
The artwork on the card was inspired by the Aboriginal art I saw so much of when we were in Oz. Now my card is by no means Aboriginal art, but simply my own take on it from the inspiration I had! I don’t pretend to know anything much about the Aboriginal culture, and this card has no ‘story’ to tell like with many of the Aboriginal drawings. But I had great fun playing around painting in dots and being ‘arty’ for half an hour!! =)
The stamped sentiment at the bottom is from an idea Kristina Werner (similar to her card in this post), which I’ve used recently for this card.
The video below is slightly longer than usual, because I take you through all of the painting process, just in case you wanted to have a dabble with acrylic paints yourself. It’s so much fun!
Don’t forget to head over to my YT Channel to rate & subscribe!


")


")
 I broke out a new paper stack called


 The bits I like:


 The artwork on the card was inspired by the Aboriginal art I saw so much of when we were in Oz. Now my card is by no means Aboriginal art, but simply my own take on it from the inspiration I had! I don’t pretend to know anything much about the Aboriginal culture, and this card has no ‘story’ to tell like with many of the Aboriginal drawings. But I had great fun playing around painting in dots and being ‘arty’ for half an hour!! =)