Just a quick post today as I’ve got a load of DIY to do this evening (it’s never ending!). I wanted to share my 6th Christmas 2010 card design, and there’s a video tutorial of it for you too. This is a more traditional coloured card than I usually do, so it made a nice change. I like to leave my comfort zone occasionally!
Something a little different today! This is really not my usual style of Christmas card – mainly because this one is unsuitable to be made in bulk. I’m doing a one-off (for once!).
There just isn’t enough patterned paper in the paper pack to create more than a few of this exact design. But that’s ok; it makes a nice change to make a singular card, rather than having to think up a design that can be replicated in bulk.
I like every part of this card except the glossy accents on the “Wishes” word. The ink underneath the glossy accents smudged during the drying process. I should’ve realised that this would happen, using distress inks, it was inevitable, but I thought I’d risk it…and lost. But it doesn’t look too bad I guess. I’m just going to pretend it was meant to look like that, although for future reference, I will only use chalk inks or StazOn inks for applying glossy accents to! Lol!
I’m super pleased with how the snowflakes have turned out. These are my own design that I’ve made into stamps using the ImagePac stamp kit. I’ve also created a slightly larger version of the stamp to use as a die cut. So I can die cut loads of the snowflakes in advance, and then stamp straight onto the cut-out. This then saves me having to cut out very intricate shapes by hand – and looks a lot more crisp and professional. And you don’t get RSI from cutting out loads of shapes =)
The video is below as usual. Hope you enjoy! Don’t forget to comment and subscribe at my YT Channel, and to join my Facebook group for my blog and YouTube updates. Have a great day!
Quick post today, as I’m off to work shortly. This card video took an AGE to upload to YouTube last night, hence leaving the blog post until this morning.
I’m using techniques taught by Jennifer McGuire in her Thinking Inking classes, but basically, this is exactly the sort of thing that Distress Inks were made for. I just love the effects you can get from using these inks & a spritz of water!
So much fun. Available to buy at My Folksy Shop in singles or packs of five too =)
The video is below as usual. Hope you enjoy! Don’t forget to comment and subscribe at my YT Channel, and to join my Facebook group for my blog and YouTube updates. Have a great day.
Another Christmas card for you folks! Available to buy at My Folksy Shop in singles or packs of five too =) This card is another simple one – the only way Christmas cards can be, when you’ve so many to make! I broke out my CraftRobo to cut the snowflakes in the Kraft cardstock. This was a super simple design, which took me about 10 minutes to design. This is a great way to bash out a bulk load of Christmas cards – just design your card, repeat the design to fill your A4 card, pop it into the ‘Robo, and off you go!
Just wanted to show you a card I made for my friend’s birthday. I didn’t record it at the time, so I made another for y’all and videoed that one. It’s below. Enjoy!
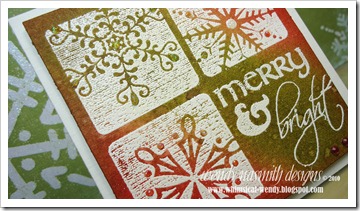
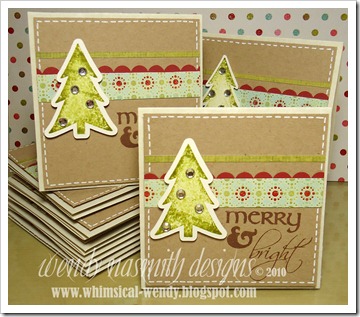
This is the second in my Christmas card series for 2010. It uses very little in the way of supplies – pick one focal stamp, one sentiment stamp, 1 sheet of repetitive patterned paper cut into strips, another plain paper cut into very thin strips, some gems and a scalloped border punched contrasting cardstock. Perfect for making mega bulk-batches of Christmas cards!
As you can see from this photo, I’ve already made quite a few…
…so if you want to get a head start on your Christmas card shopping this year, you can head over to my Folksy shop to grab a pack. I’m selling them in packs of 5. This is a super-cheerful card, just right for this time of year, and perfect for Christmas. They are approx. 4” x 4” in size, and of course, I’ll send you 5 envelopes too =)
The video below shows how I made the card, but I also give you some tips on bulk-making cards, great for this time of year, when if you’re anything like me, you’ve got loads of Christmas cards to make!
Super late in sharing this one with you guys. I was going through some of my old card photos and spotted this one and couldn’t remember ever blogging about it. So I’m doing it now!
I used this gorgeous flocked paper pack from GCD Studios called Paris Nights – scrumptious! The card was for my parent’s wedding anniversary this August just gone. And the reason I didn’t share it, was because I made it in such a rush before heading off to Australia, that blogging it was the last thing on my mind.
So no video tonight…but instead I’m trying to make and share more cards with you all more regularly, even if I don’t have time for a video post. I find myself sometimes NOT crafting because I felt I always have to record my work. And sometimes I just don’t feel like it; I just want to craft in my own sweet time!
However, that said, I recorded a video today for the cutest little card I’ve made in a long time, so I hope to have that up by mid-week, if not sooner…sneak peak tomorrow! =)
It’s (kind of!) that time of year again, so I thought I’d get ahead of the game and get one of my many Christmas cards done.
I’ve used the same paper pack as I did last year, as there are so many lovely papers still left – and they’re just as beautiful as ever!! It’s called Winter Wonderland by My Mind’s Eye. I’m not sure if you can get these particular papers this year, but there’s bound to be similar (& just as gorgeous) Christmas themed papers out there for this winter season.
Don’t make the mistake I did and heat emboss your vellum for too long – it went a bit wrinkly, but I’m not precious and didn’t bother to change it. Life’s too short, right?
As for the sentiment, this is a stamp I designed myself. I’m thinking of putting a couple of my stamp designs in my Folksy shop – so please leave a comment if you would be interested in me selling these. I just want to see if it would be a worthwhile venture to help fund my video blogging. I’ve just purchased a v. expensive new camcorder, because I had loads of comments about my videos ‘focus-hunting’ (kind of zooming in and out of my craft desk) which was making people kinda dizzy…so no more of that, yay…but all of this costs more than I have, so ways of subsidising this would be helpful for the old craft purse =)
As usual, the video is below. If you enjoy, please head over to my YT Channel to rate & subscribe. You can also follow me to get my latest blog updates by clicking on the “Follow” link on the right hand side of my blog and also via Facebook, where I have an artist’s page for all my crafty updates.
I made this card back in the summer for a family member, but didn’t realise that I hadn’t posted it on my blog…so I’m posting it now!
These gorgeous little flowers were oh-so-simple to make. I will do a video on them shortly. The video I made of this card stopped halfway through and I hadn’t realised, so that’s why I can’t share it with you here! Oops…
But they’re just too cute not to share…imagine these with some diamond Stickles on the edge of the petals twinkling away…ideas, ideas!!
The dry embossed background was done with my bone folder and my paper trimmer, but would have been 20x easier with a Martha Stewart Scoring Board. This is SO on my wish list for Christmas.
A similar version of this card was for my brother’s birthday! I wanted something masculine, but not dull and monochrome but bright and cheerful. So this card was born!
The glossy accents I’ve used on the circle punch outs really lift the colour in them – they almost look like shiny brads! Speaking of which, in my next video, I’ll show you how to make patterned brads to match any project, such fun =)
I love this embossing pen as it has two tips, one thick, one thin. Perfect for frame borders and embossed writing! And it stayed wet long enough to hold the embossing powder for a perfect finish. Love it!
For sale: It’s also available to buy in My Folksy shop at this link. Your support is gratefully appreciated =)
As usual, the video is below. If you enjoyed it, please head over to my YT Channel to rate & subscribe. Don’t forget to “follow me” (link on the side of my blog) to keep up-to-date with my most recent posts.
Here’s my submission for this month’s Scrapbooking & Crafting Friends design team using a stamp by MyGrafico called Little Witch 1. Now I know I’ve said before that I just don’t ‘do’ Halloween, but I couldn’t resist this stamp. It was simply too cute and a great way to wean myself in to Autumn here in the UK!
Now there’s no video today, because I just felt like sitting at my craft desk and making a card without the camcorder whirring away above me…and I had a blast ;-)
The font for the Happy Halloween is called ‘Impact Label’ which I embossed straight out of the printer to get it to look similar to that Dymo Tape I used to label everything with as a kid. My stationary was really anally organised back then. Much like my craft room is organised now…I wish =)
The digi stamp is coloured using a mixture of copic markers and pencil crayons, a technique which I demonstrate in this video post. I then highlighted all the cobwebs with glittery Stickles and made the spider’s and the cat’s nose ‘3d’ with some glossy accents. Great fun!
Don't forget to follow my blog (link in the right sidebar)----------------------------------------------->
This card is for the lady we stayed with on our recent holiday to Australia. We stayed with her for a week during our time there, so I thought it would be nice to show our appreciation by sending her a thank you card! I also made another one for my in-laws, who were generous enough to take us with them on their holiday. I have the best in-laws ever!!
The artwork on the card was inspired by the Aboriginal art I saw so much of when we were in Oz. Now my card is by no means Aboriginal art, but simply my own take on it from the inspiration I had! I don’t pretend to know anything much about the Aboriginal culture, and this card has no ‘story’ to tell like with many of the Aboriginal drawings. But I had great fun playing around painting in dots and being ‘arty’ for half an hour!! =)
The stamped sentiment at the bottom is from an idea Kristina Werner (similar to her card in this post), which I’ve used recently for this card.
The video below is slightly longer than usual, because I take you through all of the painting process, just in case you wanted to have a dabble with acrylic paints yourself. It’s so much fun!
Don’t forget to head over to my YT Channel to rate & subscribe!
Just a note to say…whatever you want it to say! Who needs an excuse to send a card, heh? This one would be great just to cheer someone’s day.
I used this stamp set from Hero Arts and challenged myself to use the smallest flower stamp. I have great ideas for the two big flower stamps in this set, but hadn’t thought about what I’d do with the smaller one, so I promised I would do a card with that one first before I broke out the ‘easy’ ones.
This whole set is just made for paper piecing. You’ll be seeing a few more of this sort of card from this set! Love it!
As promised yesterday, the video is below. It’s a little longer than usual. Not sure why…perhaps I’m just on a jet-lagged go-slow following my holiday =)
Don’t forget to head over to my YT Channel to rate, comment & subscribe!
Well I’m now back from 3 weeks in Australia (hence the prolonged absence!), and I have already shot another video, and edited it. So all that’s left to do is the voice over and uploading it to YouTube…so the next tutorial should be live tomorrow evening all being well! I just wanted to let you know what was happening as I’ve been neglecting blog-land for a while because of being on the other side of the world. I suppose that is a good excuse though? Lol!
Here’s some pictures from my holiday for you to see, and I’ll be back tomorrow with the card & video…
Headland/coastal walk along some of Australia’s beautiful coastline.
Uluṟu from a distance in the Red Centre. So magical.
A beach. All to myself. Wow!
A gorgeous little koala at the Billabong Zoo. So cute!
We did so much on this holiday, I need another week off to recover! We climbed the Sydney Harbour Bridge, swam the Great Barrier Reef, went whale watching, did Uluṟu and Kata Tjuṯa, then a few days in Singapore on the way home. We had an absolutely awesome time. Back to work & reality tomorrow though…
Hope you enjoyed seeing some of my holiday snaps. I’ll see you tomorrow with a new card & video! =)
I know, I know – this is slightly different to the video – but after I finished shooting, I decided I wanted to see what it would look like with the brown lettering on the sentiment, rather than the lily white letters they began as…so I used my copic markers and coloured them in dark brown and stuck them back on the card (similar to what I did in this video here). I rather prefer it this way, but it was too late to go back and reshoot the video.
I figured you’d all get the idea though so I didn’t need to reshoot =)
The ‘happy birthday’ stamped flags were inspired by Kristina Werner, who’s work I adore (similar to her card in this post)! I’ve been told I have a Kristina Wernerish style, so it’s no surprise that I just LOVE her work and that I’m constantly inspired by her creations!
This card was a commission I did for someone last month, but have only got around to posting just now!
My two best friends have just got married last weekend, and I have been super busy doing all the stationary for their wedding, which went off wonderfully (thank goodness!). [I hope to share the stationary I did for them soon. It’s super scrumptious – I only wish I knew half the techniques I used on it for back when I got married, and my stationary would have no doubt been similar…]
Back to this card – I love the American Craft Thicker stickers – they add a nice bit of bling to the overall card. The patchwork quilt heart was all hand drawn and cut out (rather laboriously) but I’m sure there is definitely a simpler way of doing this technique, I just didn’t think it through properly when I was doing it for the video, but you get the idea anyway I’m sure =)
The video is below, I hope you enjoy watching it & happy crafting!
This card is for a new baby girl, and can be easily converted to an “it’s a boy” by using blue themed papers and changing the sentiment. I’ve used a set of digi stamps called "On the Line" from MyGrafico.
I’ve used the paper piecing sentiment for the whole of this card, so there was a lot of cutting out required! But it was worth it in the end, and I just LOVE the little baby-gro effect, it’s super cute =)
The sentiment does not come with the digi stamps, but I created it in no time using MS Word. The font was Helvetidoodle by Ed T, which you can download for free at DaFont.com – an absolute treasure trove of super fonts to suit all different tastes and needs.
The video is below, as usual, don’t forget to head over to my YT Channel to rate & subscribe!
Another Father's Day card for those of you still stuck for ideas for masculine cards. Men are just so darned hard to create cards for, but I actually enjoy the challenge. This card is quite bright and summery, but still retains just enough 'masculinity' to work as a card for a Dad (I hope!).
I was initially inspired by this card and this card by Kristina Werner but I got a little bit over excited when creating my card and forgot to adhere the vellum on before anything else…and once that glue is stuck, there’s no getting it off for love nor money! So I had use another technique for holding the vellum in place on that bottom right corner.
So, working with the design I had in mind, I just used the stickles a little further down the card than I had planned, and ‘glued’ the vellum edge down with a few blobs of stickles.
And because the rainbow polka dot c.s. that I used just below it had glitter blobs on it too, it kind of looks like it’s meant to be falling into the next part of the design. Phew – card saved from the scrap heap!
Below is the video as usual, please don’t forget to head over to my YT Channel to rate & subscribe if you haven’t already! I’m nearly at 1,000 subscribers (!) so I’m super-happy and grateful to you all for your support.
Well it's been a beautiful day here in the UK - summer is well as truly on its way! I love June, for many reasons, but it's my birthday month, so that's another reason to love it.
This card is for my Dad for Father's Day. I've used a Martha Stewart deep edge border punch and slightly customised it to create the shiny black trellis border at the top. I think that gives the ric rac ribbon some balance nearer the bottom of the card.
I've been doodling all over with my white gel pen! I did some 'morse code' doodling around the "Best Dad" sentiment and doodled the "in the world" to mimic the doodlebug rub ons. And of course, not forgetting the faux stitching around the edge =)
The video is below. I hope you enjoy it and that it gives you some inspiration for your own Father's Day cards this year! Don't forget to head over to my YT Channel to rate and subscribe.
For today’s card, I’m just doing something super simple that you should be able to whip up yourselves in no time at all. I’m using this card to send a note to a friend, and my plan is to use a trick I learnt from Kristina Werner by not writing on the inside of the card at all, just sticking a post-it note in there, along with the letter I want to send. Then the recipient can take out the post-it and reuse the card. All they have to do is find another envelope and they’re ready to go. It’s like a double-barrel surprise; a handwritten letter AND a note card she can send on herself.
The original design for the card was for a Get Well Soon card, but I had to send that in a rush, so I remade it and adapted it to a new sentiment.
As usual the video is below. Please head over to my YT Channel to rate & subscribe!
Hi folks! Just a couple of things to update you with before my next video goes live later on this evening…
After many suggestions from friends, I have created an artist ‘fan page’ over at Facebook, so it’s now easier for you to link to me over there and get the most current updates from me as it’s all linked to my Twitter account too.
I also have two shops, one at Etsy and one at Folksy where I’m selling all my stuff. The Folksy account is priced in £’s and the Etsy one in $’s, so you can choose which you prefer, but you can buy from either regardless of where you are in the world. Pick the best exchange rate for you!!
My aim is to up my video tutorials to one a week (currently it is just once a fortnight if I’m lucky) because my new video editing software is much quicker and less frustrating it should enable me to do more with the time I have available.
Please leave a comment at this post for any techniques you’d like me to demonstrate and I’ll see what I can do for you!
As usual, any questions, please email me and I’ll get back to you as soon as I am able.
Pop back a little later for my next video tutorial =)
I made this card as a commission for a customer. It was for a male recipient, but I didn’t let that stop me from using a flower! Flowers are there to cheer anyone up, right?
It is a fairly simple card, and if I had enough micro chip stickers I could’ve made quite a few…but I’m running very low on my Basic Grey chipboard stash! However, there's a couple for sale in my Folksy Shop if you'd like.
I’ve also had to change my video editing software and it’s taken me quite some time to get to grips with the new one with all it’s quirks and the templates I’ve had to reprogramme. But it’s all done now and soooo much better than my old program.
Below are some more photos, of a similar card I created using the same layout and papers, but with a different sentiment. I hope you like it! The video is also below – please don’t forget to head over to YouTube to rate & subscribe =)
Hi – these cards are similar to a previous design of mine, but they remain a firm favourite, so I’ve made a batch of them to sell. So if you’re interested, you can buy these at my Folksy Shop as a single card, or as a pack of five. The card packs are really good value, because you are essentially getting one free! They are also great to buy as gifts for friends – a very useful gift that keeps on giving ;0)
The video for this is below – it’s an oldie, but I hope you still enjoy the creative process with a trip down memory lane…and sorry in advance; you can barely hear me, lol!!
I spent quite a lot of time cutting out all of the features of this card, but it was so worth it in the end. I just love this effect! I’ve got more plans for this technique…
I have done a video tutorial on this – and it was a labour of love I can tell you! My computer died, just as I finished editing the video and I lost it all, despite saving a zillion times, and I ended up reinstalling my pc and starting from scratch. So it’s three days later than originally planned. Grr!
I also have news – I’ve been accepted as a YouTube Partner!!! I’m so excited about this new development. Apart from anything, it means I get to choose the thumbnail on my videos, which is 100 times better than the thumbnails YT picks for you =)
So without further ado, here’s my latest video! Please rate & subscribe =)
This card is for my Father-in-law who’s 58 today! It’s a single layer card, so I’ve also added to Kristina Werner’s One Layer Card Challenge. Single layer cards are difficult! The temptation to add extras to it was almost unbearable at times, but I did have fun challenging myself to stick to the one layer, and made it doubly difficult for myself by making the challenge card a masculine one too!
I’ve made it using black c.s. which can be a difficult colour to work with, but this c.s. has a nice embossed pattern in it, so it’s not just a block of black, there’s a subtle pattern there too.
The Happy Birthday sentiment was stamped with Papermania’s Alphamania stamps, and I was inspired by an idea from one of Kristina’s earlier cards to stamp them with Versamark in a circle using a masking technique. I then embossed using white e.p., faux stitched around the edges and added some clear embossed stars around the outside just to help break up the expanse of black a bit more.
No video tutorial for this one – but I am currently editing my ‘Sneak Peak’ video for a card I made the other day, which should go up later on today. I just didn’t want to miss entering this card for Kristina’s challenge which ends in a few hours.


 This card is another simple one – the only way Christmas cards can be, when you’ve so many to make! I broke out my CraftRobo to cut the snowflakes in the Kraft cardstock. This was a super simple design, which took me about 10 minutes to design. This is a great way to bash out a bulk load of Christmas cards – just design your card, repeat the design to fill your A4 card, pop it into the ‘Robo, and off you go!


 The glossy accents I’ve used on the circle punch outs really lift the colour in them – they almost look like shiny brads! Speaking of which, in my next video, I’ll show you how to make patterned brads to match any project, such fun =)


 The artwork on the card was inspired by the Aboriginal art I saw so much of when we were in Oz. Now my card is by no means Aboriginal art, but simply my own take on it from the inspiration I had! I don’t pretend to know anything much about the Aboriginal culture, and this card has no ‘story’ to tell like with many of the Aboriginal drawings. But I had great fun playing around painting in dots and being ‘arty’ for half an hour!! =)


 This card is for my Dad for Father's Day. I've used a Martha Stewart deep edge border punch and slightly customised it to create the shiny black trellis border at the top. I think that gives the ric rac ribbon some balance nearer the bottom of the card.
 I’m using this card to send a note to a friend, and my plan is to use a trick I learnt from


 I’ve made it using black c.s. which can be a difficult colour to work with, but this c.s. has a nice embossed pattern in it, so it’s not just a block of black, there’s a subtle pattern there too.