Well I splashed out about bought myself some more MFT dies. I love that company – their dies are awesome quality and they ship same/next day – important when they’re shipping overseas as it means I get it as soon as I possibly can this end!
This card is quite a good one for the man in your life. It’s very much “no frills” and to the point. I like the simplicity of it – but don’t be fooled, it did take quite a while to complete.
I like the colour scheme – the grey on ivory is subtle but is balanced well with the pillar-box red hearts and handwriting.
I have done a video – it’s quite a long one, as I’m a bit out of practice ;-$ but I hope you enjoy it anyway and find it useful and inspiring.
What a busy few months I’ve had! I’ve not even started my Christmas shopping, let alone handmade all my Christmas cards this year :-( But I knew you all deserved to get at least one Christmas card video before Christmas, so here you are!
[I’ve made this card using the above software. Please feel free to click on the image to take you straight to the download page of their website. If you have a Silhouette or a CraftRobo machine, you should be able to download and use this software as they are both the same machines, that (for some strange reason) are sold under different names in different countries.]
I made this card to be bright and cheerful. That’s what Christmas should be all about, so I chose some non-traditional pinks and greens, and hand coloured the trees on the inside of the card.
At the moment, I’m all about the weird and wonderful shaped cards, and this one is no exception as I’ve cut three frames into the front of the card and stamped the Christmas tree images straight onto the inside of the card.
I loved making this card. I hope you love watching me create it – all from the comfort of my new home, and new craft area(!). My life has been in such upheaval and I’ve been packed up in boxes for so long now, I’m so pleased to be crafting again. It’s a shame I missed out on the big run up to Christmas, and doing lots of Christmas videos for you all, but sometimes life doesn’t work out so neatly for you, does it?
There’s two video’s below; one is the designing of the card in Silhouette Studio, the second puts the card together at my craft desk. Enjoy!
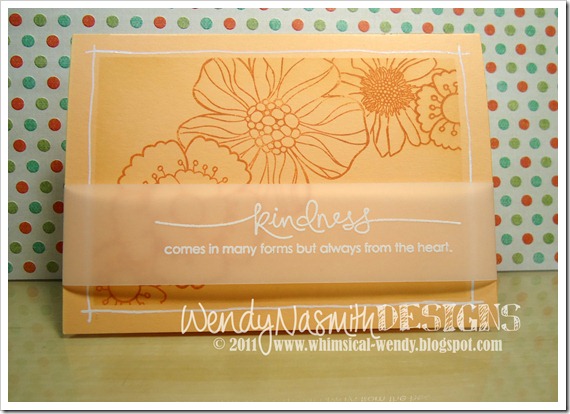
I wanted to make a card using masking techniques with this Blossom Art stamp set by Hero Arts.
This is a really simple technique that gives some beautiful effects. It can really stretch your stamp sets to make them even more versatile, by effectively creating larger ‘background’ stamps out of several smaller ones.
The sentiment stamp is called Heard from the Heart by Stampin’ Up! and I just love all the sentiments in this set. I use a technique of white embossing on vellum cardstock to give the sentiment added interest without covering up all of the stamping underneath. Kristina Werner uses this technique a lot and it inspired me to try it myself.
As usual, please don’t forget to rate and subscribe to my YT Channel. Also, if you ‘follow’ my Facebook and Twitter pages, then you’ll always know when my next video/blog post is up. Hope you like the video. See you next time!
Something VERY different for me today to share with you! And a video too, yay!! “Finally!” I hear you all shout…I know, it’s been quite a while. I’m very sorry. As it has recently been described to me – life has been “biting me on the bum” of late, so making card tutorials definitely slipped down my priority list :(
But I really missed doing them, and so I filmed this one for you all. I figured after all this time, this card had to be something a little special, and I hope you agree – it’s definitely different to my usual cards!
I decided to go for a completely different shaped card. I don’t know where I dreamt this particular shape up, but there you go…
I wanted to use these beautiful flocked papers called Paris Nights by GCD Studios. But this card was for a male – so it couldn’t be too feminine! Hence the change in the shape of the card to make it a bit more appropriate for its male recipient. I hope you think it works? I really love this card, even if I do say so myself. It actually pained me to send it, lol! =)
As usual, please don’t forget to rate and subscribe to my YT Channel. Also, if you ‘follow’ my Facebook and Twitter pages, then you’ll always know when my next video/blog post is up.
PS. Thanks for all your patience and lovely supportive emails since my last video. You’re all gems =)
I thought I’d do you a very quick video below showing you how I store my dies in my craft room. I use lots of different brands of dies; die-namics, Cuttlebug/Provocraft, Nestabilities, store brand dies etc, and a lot of them have several dies in each set – and some are quite small and easily lost. So I store all of mine in empty cd cases, using magnetic self-adhesive sheets to hold the dies in place. Then I can see exactly what’s where, and clearly identify missing ones that I’ve left lying around my craft area (tut-tut, Wendy!) and need finding immediately before they accidently get binned!
I thought it was time to do another Silhouette Studio video tutorial!
[I’ve made this card using the above software. Please feel free to click on the image to take you straight to the download page of their website. If you have a Silhouette or a CraftRobo machine, you should be able to download and use this software as they are both the same machines, that (for some strange reason) are sold under different names in different countries.]
I love the colours in this card. This paper stack is definitely one I’ll be using again! I could’ve chosen so many other beautiful papers from this stack – spoilt for choice. I think MME are my favourite paper company in terms of their gorgeous designs. Lush!
There’s two video’s below; one is the designing of the card in Silhouette Studio, the second puts the card together at my craft desk. Enjoy!
This card has been inspired by a couple of cards by the wonderfully talented Kristina Werner. She did both a Finally Friday card and a Make A Card Monday (MACM) card recently, using the one-layer technique. I saw these cards and I just had to have a go at one myself…
Both Kristina and I have a borderline obsession with Kraft cardstock ;) And the Chestnut Roan ColorBox Chalk Ink really does go so well with it. Also, it didn’t seem to smudge at all when using copic markers over it, which quite surprised me in a very good way!
Enjoy the video below, which shows you how I put the card together, including a few tips I hope you find useful.
Please don’t forget to rate and subscribe to my YT Channel. Also, if you ‘follow’ my Facebook and Twitter pages, then you’ll always know when my next video/blog post is up.
I {heart} my Silhouette machine. Look at those gorgeous crisp cuts on this card. Awe-some-ness!
I’ve made this card using the above software. Please feel free to click on the image to take you straight to the download page of their website. If you have a Silhouette or a CraftRobo machine, you should be able to download and use this software as they are both the same machines, that (for some strange reason) are sold under different names in different countries.
I know I shouldn’t blow my own trumpet, but I really love this card. Its a CAS design that has used some rather feminine papers actually, but it worked out as a great Father’s Day card nonetheless.
Just in case you were wondering, I really don’t like using “male hobbies” as focal points for masculine card designs. Well, at least whenever I try to make a card with a cricketer or fisherman, for example, they end up getting filed under “bin”. It just doesn’t work for me and my particular style. Do you have any tips for designing masculine cards?
Enjoy the video below, which shows you the Silhouette Studio design aspect, as well as putting the card together. Please don’t forget to rate and subscribe to my YT Channel. Also, if you ‘follow’ my Facebook and Twitter pages, then you’ll always know when my next video/blog post is up.
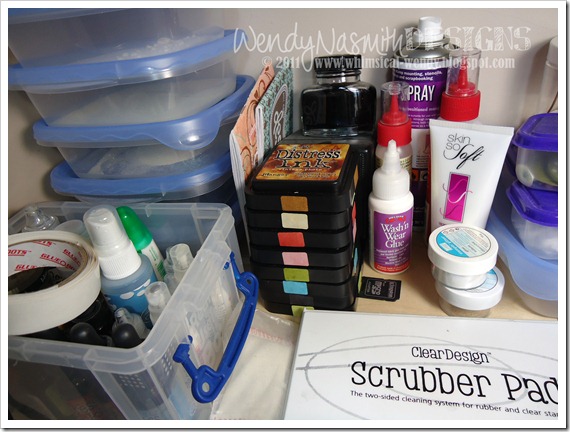
Super quick post today. And you get to see a bit of my craft room – this is the tidy bit, lol!
I get asked a lot how I store my distress inks. I have them in a stack, stored face up (Distress Inks are so juicy, they don’t need to be stored face down like other pads). I simply identify the colour on each side of the pad using a tiny sticker coloured with the ink itself. Very easy, very quick, and saves a whole lotta hassle in the long run, constantly searching for a colour, especially if you have lots of ink pads! Hope it helps you all too =)
Father’s Day is really truly only just around the corner now {which means so is my 30th birthday, but hopefully that won’t be too traumatic!!} so here’s another design that you can use to create a nice card for your Dad.
I created this design for a craft day with my friend Katherine, who is more used to working with glass, and has never made a card before and really wanted to give it a go. So I kept it fairly simple, but still, there are quite a few techniques going on in the card. I wanted her to have a good play around with paper techniques!
We also messed around with combining some glass techniques with my paper craft and came up with some really beautiful pieces (sparkly silver swirls on blue fused glass – gorgeous!!). I will have to show you those when I get a picture from her.
Techniques used in this card were die-cutting (lots of), eyelet setting using a crop-a-dile, faux stitching and corner chomping. So the video ended up being 10 minutes long!
Enjoy the video below,and please don’t forget to rate and subscribe to my YT Channel.
You might have noticed I have been away from my craft desk. For ages. I’m so sorry. I don’t really know how it happened. I guess life just got too stressy and busy for me all at once and I just hid away for a while, reading lots of books. This is my way of just stepping back from things for a while & recharging my batteries.
The reason: I’m being made redundant at work, and given the current job market in the UK, it’s going to be tough to find a new job that (a) pays enough to pay the bills and (b) be near enough so I don’t have to spend all my hard earned pay on petrol – and at £1.37 per litre (£6.23 for a UK gallon!) the job will have to be pretty close by!
So as a result, I’ve not been feeling very creative. I got crafters block on any new designs. I made some cards that I hated and threw away, frustrated. And then recently, I started coming up with some new designs that I wanted to try out and I was back at my craft desk once again. Phew!
BACK TO THE CARD…
The sentiment is “hello” to say “hi” to you all after being MIA for so long. Thanks for being patient =)
I ordered some of the Die-namics dies from My Favorite Things, which arrived this week (very quickly seeing as they shipped from the USA). They. Are. Awesome.
They cut through felt so well – and there was me thinking they’d struggle, because to be honest, they don’t look like they’d cut through much more than paper. They don’t look fragile as such, just nowhere near as beefy as the dies you get from Sizzix or Provo Craft. But they do exactly the same job, whilst taking up much less room! Thumbs up from me there.
I demonstrate using one of the dies in the video below, the Mini Rolled Roses die, using felt. You will need fabric glue for this. Trust me, I tried with Glossy Accents and TomBow glue and neither worked. They just came apart afterwards. I actually believe a hot glue gun would be the best for this as it would hopefully fuse the materials together and set/dry almost instantly. I don’t have one, so do let me know if you try this with a glue gun. I want to know whether to invest as I’m far too impatient to wait 4 hours for the fabric resin glue to set (I ended up sewing these flower together in the end, just to get the video finished!).
The video is below. It’s a long one! But I do show you a lot =)
Please don’t forget to rate my videos and subscribe to me over at my YT Channel. Also, if you ‘follow’ my Facebook and Twitter pages, then you’ll always know when my next video/blog post is up.
It’s time for another Silhouette Studio tutorial! This card is made in its entirety with the Silhouette/CraftRobo machine and is super simple to design using the SS software.
This design requires the above software. Please feel free to click on the image to take you straight to the download page of their website. If you have a Silhouette or a CraftRobo machine, you should be able to download and use this software as they are both the same machines, that (for some strange reason) are sold under different names in different countries.
This card is a masculine card – all you need to do is pick some strong masculine patterned papers and you’ll have a great card for all the men in your life!
Please don’t forget to rate my videos and subscribe to me over at my YT Channel. Also, if you ‘follow’ my Facebook and Twitter pages, then you’ll always know when my next video/blog post is up.
I know, I know. I promised you this post and video last week, but life got busy and before you know it, another week had gone by…
Sorry, but I hope you understand ;)
I love this card. It was super quick, really easy and you all must think so too, cos I’ve sold quite a few of them to various folks this week. There’s still some available in my Folksy and Etsy shops for you folks in the USA to get ahead of Mother’s Day for you on 8th May.
Anyway, the video is below as usual. Please don’t forget to rate my videos and subscribe to me over at my YT Channel. Also, if you ‘follow’ my Facebook and Twitter pages, then you’ll always know when my next video/blog post is up.
Some of my longer-time fans may recognise the top of this card from this post…
…but I loved this design so much, I decided to make it into a Mother’s Day card for this year. All you need to do is change the sentiment, and “ta-dah!” you have a great Mother’s Day card ready to go.
I keep several cards like this without a sentiment already stamped, so that if I’m stuck for an emergency card, I can whip out just one stamp and I have an instant card that doesn’t look at all rushed. Sneaky but perfect!
This card is available at my Folksy and Etsy shops and I do post them out within 24hrs of your order so you can be sure to get it in time for Mother’s Day. Any support is very much appreciated ;)
As I’ve been super busy putting in my new bathroom (which seems to be taking forever) as well as working full time, I don’t have a new video this week. Sorry, I’m just trying to do too much at the minute, but I am re-linking the video below that shows this card but with a Happy Birthday sentiment to tide you over in the meantime. I’m hoping to film my second Mother’s Day card design tomorrow night, so the video should be up in a few days. Thanks for your patience!
Quick post today – just wanted to show you a couple of cards for different occasions using a similar design.
It’s so easy to change a card design to suit your needs. Here I’ve just exchanged butterflies with hearts, and I have an anniversary card as well as a birthday card.
Super quick this way too, as you only have to think up one layout! =)
Anyway, the video is below as usual. Please don’t forget to rate my videos and subscribe to me over at my YT Channel. Also, if you ‘follow’ my Facebook and Twitter pages, then you’ll always know when my next video/blog post is up.
Ever get bored of the same old square/rectangular base cards? Well I thought I’d try something a little different and design a birthday card in the shape of a flag! No real reason, just thought it would be a cool shape to try!
This particular card is clearly for a feminine recipient, but the design could be easily customised into a very masculine card – even a patriotic card, which would be very timely with the Royal Wedding coming up next month =)
You could really go to town and totally bling it up, too. But that’s not my particular style, so you’ve got clean and simple from me as usual today, lol!
Don't you just love the way the card seems to hover in the air, because so little of it is actually touching the table top. Cute!
This design is one which has been in my sketch book for ages, but I’ve just not got around to creating the die cut file. But I finally did it this weekend and also filmed the process as a Silhouette Studio tutorial as well as the usual video of how I make the card. So you get double the fun for today’s post =)
This design requires the above software. Please feel free to click on the image to take you straight to the download page of their website. If you have a Silhouette or a CraftRobo machine, you should be able to download and use this software as they are both the same machines, that (for some strange reason) are sold under different names in different countries.
I really like the design of the base card itself – the circle cut out create sort of a ‘wheel’ which would be great for making a masculine card with. I wanted to use girly papers for this though, hence the addition of the flower!
The only issue with these cards is creating an envelope! You have to create a square envelope and insert a square piece of card into the envelope before inserting the card itself. This is to ensure that the corners don’t get bent over during transit, which would otherwise make the overall effect a little scruffy to the person receiving the card.
Please don’t forget to rate my videos and subscribe to me over at my YT Channel. Also, if you ‘follow’ my Facebook and Twitter pages, then you’ll always know when my next video/blog post is up.
Here’s a super fast Valentine’s Day card & freebie for those of you that need to make a last minute card for your special someone!
I’ve designed the die cut myself, and as a thank you for all your comments, subscriptions and support here at my blog and at YouTube, I’m offering it here on my blog as a free download =)
I’ve saved it in all the formats I know of (!) so there should be a file for everyone to use: .AI, .DXF, .EPS, GSD, JPG, PNG, .STUDIO, & .SVG. [There is a picture of the design included, so those of you that do not have a CraftRobo or Silhouette machine can just cut out the template by hand.]
And there’s also a tutorial video as usual to show you how to put the card together below. [For those of you who are new to the Silhouette software, please view my previous tutorial video which shows you how to get around the software and design your own die cuts.]
Please don’t forget to rate my videos and subscribe to me over at my YT Channel if you haven’t done so already. Also, if you ‘follow’ my Facebook and Twitter pages, then you’ll always be the first to know when my next video/blog post is up =)
I love that this card is all pastel coloured and distressed. It gives such a soft, pleasing look to a card I always think!
I just love these butterflies from Hero Arts. They are just adorable! And they work up really quickly and easily using Distress Inks and an AquaMarker water colour blender pen from Letraset. I had such fun colouring these little beauties. They match perfectly with October Afternoon’s Fly a Kite collection papers. I really can’t get enough of these papers at the moment – just gorgeous!
The sentiment is a stamp from Stampin' Up! which I got through my good friend Monica Gale. There are four sentiments in this set, all in this gorgeous style. I’m going to be using them. A lot. =)
Anyway as usual, the video is below. Please don’t forget to rate my videos and subscribe to me over at my YT Channel. Also, if you ‘follow’ my Facebook and Twitter pages, then you’ll always know when my next video/blog post is up.
Short post tonight – this video has taken so long to upload (what is WRONG with YouTube tonight?!?) and I desperately need to go to bed…
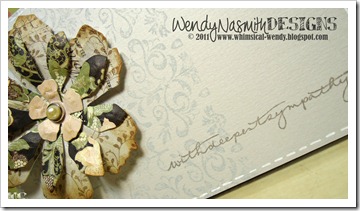
It’s a super simple card, muted tones, one floral focal point and a sentiment. I always feel sympathy cards should be clean in design, with no frills and leave the message inside to speak for itself, without being overwhelmed by the card design.
In the video, I show you how to create a seamless, repeating background image using a Stamp-a-ma-jig from Stampin’ Up! to get this tone-on-tone background on the grey card base.
I hope this card inspires you if you need to create a sympathy card. They’re definitely the hardest cards to make – and to write - without a doubt!


")


")
 I broke out a new paper stack called


")


 Sorry, but I hope you understand ;)
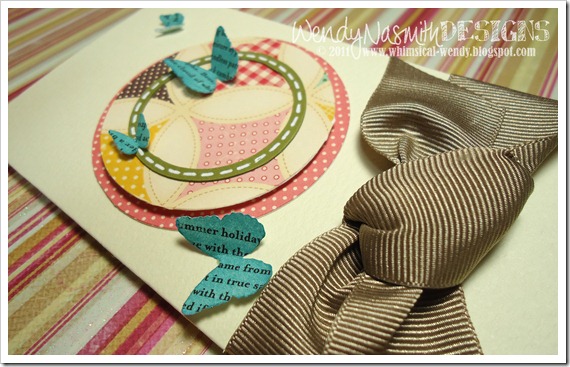


![Silhouette%20Studio%20logo%5B22%5D[1]](https://blogger.googleusercontent.com/img/b/R29vZ2xl/AVvXsEiU_rKYmDuJNfdG3xdE5togE-HgSg6yeBus0CgRUy2R162NePsJowi38mB6K10yNT3kBouCCuDlCBZToi18y-hOVqhmzushommKK_4Yc4Wr_ORN8htges4RRHOvL2schj226tDuUdJnWN9X/?imgmax=800 "Silhouette%20Studio%20logo%5B22%5D[1]")
 This design requires the above software. Please feel free to click on the image to take you straight to the download page of their website. If you have a Silhouette or a CraftRobo machine, you should be able to download and use this software as they are both the same machines, that (for some strange reason) are sold under different names in different countries.