Sunday, 31 March 2013

Wow! It has been some time…

What can I say? I’ve been away for quite some time. Pretty much completely incommunicado during that time, and I totally apologise for that. I really hope there’s still some of you guys left sticking around to read this – and for your dedication I thank and salute you!

I’ve had some pretty major changes in my life over the last 18 months. I was made redundant from my job in June 2011, then my marriage broke down soon after, and I ended up taking the difficult decision to move back in with my folks in October 2011, just feeling like my whole life had collapsed around me. These life changes totally blew my buzz for crafting – I just completely lost the inspiration to think up new designs and share them with you lovely folks. Life was on a big downer to be honest.

Anyhow, I put on a falsely brave face and put myself out there to get a job, and luckily, with a lot of hard work, I was accepted in a new position in November 2011. Life finally started back on the up!

And then later that year, I met up with an old friend who was also going through some similar tough patch, and we were a much-needed shoulder to cry on for each other during a very difficult time, and actually, ended up getting together as a couple shortly afterwards.

IMG_0270 Our relationship quickly went from strength to strength, and I knew this was the man I could finally trust my heart to <3

A couple of wonderful months went by, where I slowly began to get back the crafting bug, but then I became very ill. I was so sick, I was signed off work and put on drugs to help control my sickness.

Doctors quickly got to the route of my illness – morning sickness – I was pregnant with our miracle baby I never thought I could have!! Unfortunately, my sickness never really abated throughout the entire pregnancy, but on 27th December 2012, I went into labour and was safely delivered of our beautiful baby girl,  Hollie Joan, at 07:40 on 29th December, born a healthy 7lb 10oz, and with a lusty cry!

I can honestly say I have never felt so blessed in all my life, and all the late nights, early mornings and complete lack of sleep are all worth it. I love her to bits!

Hollie is now 3 months old. Life is still a huge learning curve – learning to be a mom, a step-mom and still trying to take some time out to remember to be me - is hard, but I wouldn’t swap it for the world! I’m hopefully getting to the stage with Hollie where she is getting into a loose routine, so I can hopefully begin to get back to my craft desk again soon, when she naps. Even better would be to do some more videos, which I am itching to do. I really feel like the crafting bug is finally coming back, hurrah!

But I’d just like to thank you all for your messages of support and your unstinting loyalty to me whilst I’ve not been on the craft scene. I really do appreciate it. Your comments and messages have cheered me up no end through some very tough times, and I thought you all deserved some sort of explanation as to where I’d been and what my plans for the future are.

Here’s my beautiful ginger princess and her happy mommy signing off for today…take care xx

 IMG_0631

Monday, 7 May 2012

Thinking of you…sympathy card

It’s been too long since I’ve been at my craft desk. And as this was a request for a bereavement card, I wanted to break myself back in gently. So, no video, and I’ve totally copied an earlier design of mine to make this a super quick card to get myself back into crafting.

There is a video on the earlier post that shows you how to create this design though, so if any of you want to check that out, it’s right here.

This card is not totally the same of course – I’ve changed the colour scheme and the sentiment, plus I’ve added some colouring to the stamping to bring out the design to be a richer effect.

I also created this on Kraft cardstock, which is my go-to c.s. if I’ve been away from my craft desk for ages, as it’s so forgiving, whatever design you choose to apply to it.

Hope you like it! I liked it so much I made two… one to give away and one to keep, lol!

Wednesday, 25 January 2012

Love you!

Well I splashed out about bought myself some more MFT dies. I love that company – their dies are awesome quality and they ship same/next day – important when they’re shipping overseas as it means I get it as soon as I possibly can this end!

This card is quite a good one for the man in your life. It’s very much “no frills” and to the point. I like the simplicity of it – but don’t be fooled, it did take quite a while to complete.

I like the colour scheme – the grey on ivory is subtle but is balanced well with the pillar-box red hearts and handwriting.

I have done a video – it’s quite a long one, as I’m a bit out of practice ;-$ but I hope you enjoy it anyway and find it useful and inspiring.

Enjoy!

Sunday, 18 December 2011

Christmas 2011 – Merry & Bright

What a busy few months I’ve had! I’ve not even started my Christmas shopping, let alone handmade all my Christmas cards this year :-( But I knew you all deserved to get at least one Christmas card video before Christmas, so here you are!

Silhouette Studio logo (for blog posts)

[I’ve made this card using the above software. Please feel free to click on the image to take you straight to the download page of their website. If you have a Silhouette or a CraftRobo machine, you should be able to download and use this software as they are both the same machines, that (for some strange reason) are sold under different names in different countries.]

I made this card to be bright and cheerful. That’s what Christmas should be all about, so I chose some non-traditional pinks and greens, and hand coloured the trees on the inside of the card.

At the moment, I’m all about the weird and wonderful shaped cards, and this one is no exception as I’ve cut three frames into the front of the card and stamped the Christmas tree images straight onto the inside of the card.

I loved making this card. I hope you love watching me create it – all from the comfort of my new home, and new craft area(!). My life has been in such upheaval and I’ve been packed up in boxes for so long now, I’m so pleased to be crafting again. It’s a shame I missed out on the big run up to Christmas, and doing lots of Christmas videos for you all, but sometimes life doesn’t work out so neatly for you, does it?

There’s two video’s below; one is the designing of the card in Silhouette Studio, the second puts the card together at my craft desk. Enjoy!

Sunday, 30 October 2011

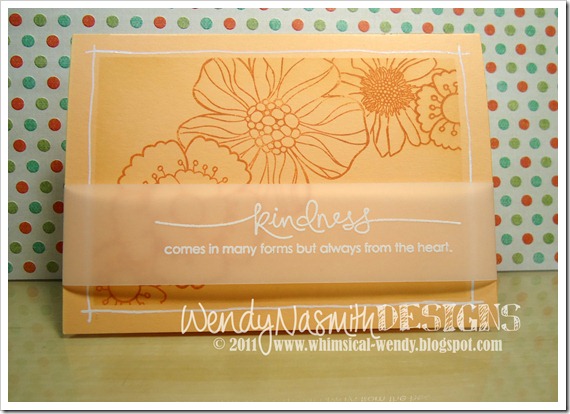
Kindness comes in many forms…but always from the heart

I wanted to make a card using masking techniques with this Blossom Art stamp set by Hero Arts.

This is a really simple technique that gives some beautiful effects. It can really stretch your stamp sets to make them even more versatile, by effectively creating larger ‘background’ stamps out of several smaller ones.

The sentiment stamp is called Heard from the Heart by Stampin’ Up! and I just love all the sentiments in this set.  I use a technique of white embossing on vellum cardstock to give the sentiment added interest without covering up all of the stamping underneath. Kristina Werner uses this technique a lot and it inspired me to try it myself.

As usual, please don’t forget to rate and subscribe to my YT Channel. Also, if you ‘follow’ my Facebook and Twitter pages, then you’ll always know when my next video/blog post is up. Hope you like the video. See you next time!

Sunday, 23 October 2011

Hope you have a GREAT birthday!

Something VERY different for me today to share with you! And a video too, yay!! “Finally!” I hear you all shout…I know, it’s been quite a while. I’m very sorry. As it has recently been described to me – life has been “biting me on the bum” of late, so making card tutorials definitely slipped down my priority list :(

But I really missed doing them, and so I filmed this one for you all. I figured after all this time, this card had to be something a little special, and I hope you agree – it’s definitely different to my usual cards!

I decided to go for a completely different shaped card. I don’t know where I dreamt this particular shape up, but there you go…

I wanted to use these beautiful flocked papers called Paris Nights by GCD Studios. But this card was for a male – so it couldn’t be too feminine! Hence the change in the shape of the card to make it a bit more appropriate for its male recipient. I hope you think it works? I really love this card, even if I do say so myself. It actually pained me to send it, lol! =)

As usual, please don’t forget to rate and subscribe to my YT Channel. Also, if you ‘follow’ my Facebook and Twitter pages, then you’ll always know when my next video/blog post is up.

PS. Thanks for all your patience and lovely supportive emails since my last video. You’re all gems =)

Tuesday, 18 October 2011

Thinking of you…


My friend’s dad recently passed away. Such sad news, even though it was expected, it’s still just awful for him. Sympathy cards are always toughies. My rule; make them simple and not with too much…well not too much anything really.

I totally feel a sympathy card should always be more about the words said on the inside, rather than too much fanciness on the outside. These cards are going to be treasured for the thoughts you write inside rather than how pretty the outside is!

That doesn’t mean they can’t portray your personality, I just think it’s an occasion when it needs toning down a smidge…

Hope you like it!

Sunday, 2 October 2011

Bob Marley Disc Birthday card

The person this card was for LOVES music. I would go as far as to say he’s totally obsessed with music and all things lyrical! So I took a quote from a Bob Marley song that I found particularly apt for him, and used it on his card [Love the life you live / Live the life you love – Bob Marley].

The card is round, as it’s to represent a cd or vinyl disc, sticking to the music theme. Plus it makes it a bit different to the rectangular/square cards that seem to dominate the card market.

All of this was designed by me using Silhouette Studio software, and the sentiment was handwritten and cut out in the same way.

No video – this card took me HOURS to get right, and I couldn’t face making it again just to video. But I thought I’d share it in any case. Hope you like it, and I’ll be back soon with a video I recorded over the weekend, so watch this space!!

Wednesday, 24 August 2011

Another New Baby card!


My friend has just become an Uncle for the first time. He wanted something pretty and pink and cute. I hope I met his brief =)

I used the Life is Good collection by Echo Park. I don’t use this pack enough – I just love these papers! The designs are just so gorgeous.
My card design was inspired by these recent cards of mine; the glittery Mother’s Day card, the stencilled Father’s day card and the ele-phantastic card. I used an element from each of these very different cards to create this new baby one. And you know what? I love it.

[Note: You can check out my videos at my YT Channel for the first two cards to learn how to make this one.]

Monday, 22 August 2011

New Baby “Welcome” card

Don’t you just love this Baby Giraffe stamp by Imaginisce? The actual stamp is smaller than this image but I needed it to be much larger as the focal point for the card, so I stamped it, scanned it in, and made it bigger in Photoshop, then quickly clear embossed the printed image before the ink dried.

The guy I made this card for wanted it to reflect the new Dad’s career (police force) so I included the checkerboard police logo as the background focal. This is why I needed the giraffe to be so much bigger – to tone down the very striking checkerboard effect of the logo! The shooting star is to incorporate the baby’s brother whose name is ‘Cosmo’. Cute name, huh?

Then I just inked the Basic Grey White Chocolate Chip micro stickers with some pink chalk ink, stamped a sentiment from Woodware’s Jane’s Script stamp set, and the card was complete!

Monday, 25 July 2011

How I store my Dies

I thought I’d do you a very quick video below showing you how I store my dies in my craft room. I use lots of different brands of dies; die-namics, Cuttlebug/Provocraft, Nestabilities, store brand dies etc, and a lot of them have several dies in each set – and some are quite small and easily lost. So I store all of mine in empty cd cases, using magnetic self-adhesive sheets to hold the dies in place. Then I can see exactly what’s where, and clearly identify missing ones that I’ve left lying around my craft area (tut-tut, Wendy!) and need finding immediately before they accidently get binned!

Thursday, 21 July 2011

Miss you

I thought it was time to do another Silhouette Studio video tutorial!

Silhouette Studio logo (for blog posts)

[I’ve made this card using the above software. Please feel free to click on the image to take you straight to the download page of their website. If you have a Silhouette or a CraftRobo machine, you should be able to download and use this software as they are both the same machines, that (for some strange reason) are sold under different names in different countries.]

I broke out a new paper stack called Pretty Please Spring Papers by My Mind’s Eye and got my old trusty Penny Black Salutations stamp set out for all the stamping. Still love this set, even though I’ve probably had it years.
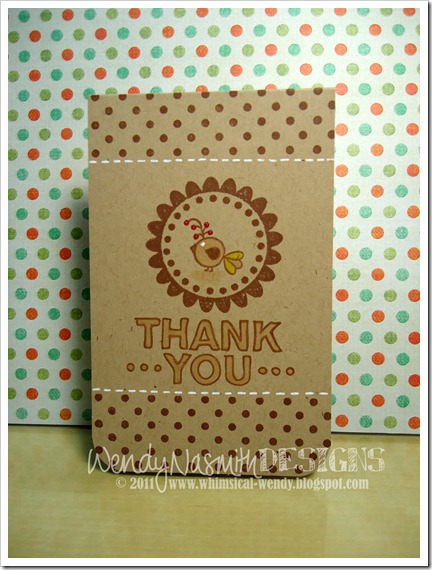
I love the colours in this card. This paper stack is definitely one I’ll be using again! I could’ve chosen so many other beautiful papers from this stack – spoilt for choice. I think MME are my favourite paper company in terms of their gorgeous designs. Lush!

There’s two video’s below; one is the designing of the card in Silhouette Studio, the second puts the card together at my craft desk. Enjoy!

Saturday, 16 July 2011

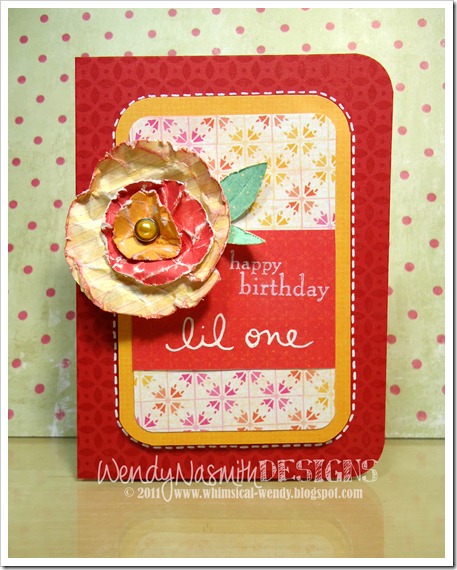
Happy Birthday Lil One

Super busy of late…job hunting (boring!) and spending some time with my Mom (wonderful!). So I thought I’d get some crafting done before I forgot how!

This card is a commission, so the bottom half of the sentiment is handwritten, as obviously, there’s no “lil one” stamp that I know of!

I quite like adding a bit of handwriting on cards. It makes them completely unique, and adds that extra very personal touch that you don’t get in mainstream cards.

I don’t have a video for this. But I do show you how I created a flower very similar to this in this blog post, so I’ve linked the video below (view from 3:15 for the flower creation part).

For those of you wondering, I do have a new video in process (a Silhouette Studio tutorial one), so check back here soon!

Monday, 27 June 2011

Thank You

This card has been inspired by a couple of cards by the wonderfully talented Kristina Werner. She did both a Finally Friday card and a Make A Card Monday (MACM) card recently, using the one-layer technique. I saw these cards and I just had to have a go at one myself…

Both Kristina and I have a borderline obsession with Kraft cardstock ;) And the Chestnut Roan ColorBox Chalk Ink really does go so well with it. Also, it didn’t seem to smudge at all when using copic markers over it, which quite surprised me in a very good way!

Enjoy the video below, which shows you how I put the card together, including a few tips I hope you find useful.

Please don’t forget to rate and subscribe to my YT Channel. Also, if you ‘follow’ my Facebook and Twitter pages, then you’ll always know when my next video/blog post is up.

Watch video below | Watch at YouTube

Wednesday, 22 June 2011

Wedding cards…

I made a few wedding cards recently. I wanted them to be a little different to the usual slushy cards that are sometimes a bit ‘twee’ for my liking.

And these are bold, bright, and very cheerful! Perfect for weddings.

There’s a lot of detail going on here. But I love the rich colours, especially on the red card, which is my favourite. These cards are accented with perfect pearls and just doodled with a white gel pen. The gold glitter blings it up to really get into the extravagance of the day!

I also very much love the sentiments. Hero Arts are great at coming up with just the right sentiment.

The other card I did was similar to the red one, but with a different colour scheme, and without the background stamp.

No video today. It was my 30th birthday yesterday, so I’ve not been at my craft desk for a good few days - I’ve been celebrating with family & friends! Back soon with a video tutorial for a thank you card though – gotta thank folks for all their lovely thoughtful gifts ;)

Wednesday, 15 June 2011

Stencil “DAD” card with Silhouette Studio tutorial

I {heart} my Silhouette machine. Look at those gorgeous crisp cuts on this card. Awe-some-ness!

Silhouette Studio logo (for blog posts)

I’ve made this card using the above software. Please feel free to click on the image to take you straight to the download page of their website. If you have a Silhouette or a CraftRobo machine, you should be able to download and use this software as they are both the same machines, that (for some strange reason) are sold under different names in different countries.

I know I shouldn’t blow my own trumpet, but I really love this card. Its a CAS design that has used some rather feminine papers actually, but it worked out as a great Father’s Day card nonetheless.

Just in case you were wondering, I really don’t like using “male hobbies” as focal points for masculine card designs. Well, at least whenever I try to make a card with a cricketer or fisherman, for example, they end up getting filed under “bin”. It just doesn’t work for me and my particular style. Do you have any tips for designing masculine cards?

Enjoy the video below, which shows you the Silhouette Studio design aspect, as well as putting the card together. Please don’t forget to rate and subscribe to my YT Channel. Also, if you ‘follow’ my Facebook and Twitter pages, then you’ll always know when my next video/blog post is up.

Watch video below | Watch at YouTube

Wednesday, 8 June 2011

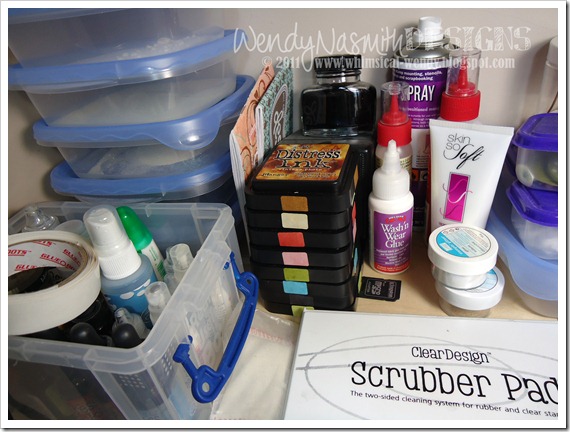
How I store my Distress Inks

Super quick post today. And you get to see a bit of my craft room – this is the tidy bit, lol!

I get asked a lot how I store my distress inks. I have them in a stack, stored face up (Distress Inks are so juicy, they don’t need to be stored face down like other pads). I simply identify the colour on each side of the pad using a tiny sticker coloured with the ink itself. Very easy, very quick, and saves a whole lotta hassle in the long run, constantly searching for a colour, especially if you have lots of ink pads! Hope it helps you all too =)

Watch video below | Watch at YouTube

Sunday, 5 June 2011

Another Father’s Day card

Father’s Day is really truly only just around the corner now {which means so is my 30th birthday, but hopefully that won’t be too traumatic!!} so here’s another design that you can use to create a nice card for your Dad.

I created this design for a craft day with my friend Katherine, who is more used to working with glass, and has never made a card before and really wanted to give it a go. So I kept it fairly simple, but still, there are quite a few techniques going on in the card. I wanted her to have a good play around with paper techniques!

We also messed around with combining some glass techniques with my paper craft and came up with some really beautiful pieces (sparkly silver swirls on blue fused glass – gorgeous!!). I will have to show you those when I get a picture from her.

Techniques used in this card were die-cutting (lots of), eyelet setting using a crop-a-dile, faux stitching and corner chomping. So the video ended up being 10 minutes long!

Enjoy the video below,and please don’t forget to rate and subscribe to my YT Channel.

Watch video below | Watch at YouTube

Monday, 23 May 2011

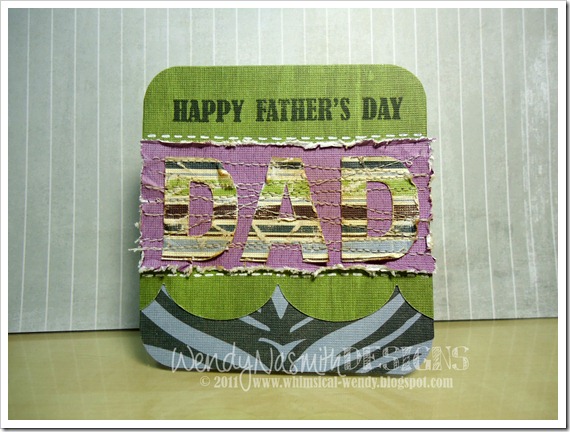
Father’s Day card

 The bits I like:

  • I used sewing on this card. Much fun, must do more often =)
  • I used some paper ageing/antiquing methods too.
  • The jumbo scallop Die-namics die cut by My Favorite Things.

The bits I don’t like:

  • Should have left the top two corners square (Put. The. Corner.  Chomper. Down!)
  • Maybe white embossed the sentiment?

But I’m not going to get hung up over these two things that I’d like to change! Enjoy the video, please don’t forget to rate and subscribe to my YT Channel.

Watch video below | Watch at YouTube

Sunday, 15 May 2011

“Hello” card and MFT mini rolled roses tutorial using felt


AN UPDATE…

You might have noticed I have been away from my craft desk. For ages. I’m so sorry. I don’t really know how it happened. I guess life just got too stressy and busy for me all at once and I just hid away for a while, reading lots of books. This is my way of just stepping back from things for a while & recharging my batteries.

The reason: I’m being made redundant at work, and given the current job market in the UK, it’s going to be tough to find a new job that (a) pays enough to pay the bills and (b) be near enough so I don’t have to spend all my hard earned pay on petrol – and at £1.37 per litre (£6.23 for a UK gallon!) the job will have to be pretty close by!

So as a result, I’ve not been feeling very creative. I got crafters block on any new designs. I made some cards that I hated and threw away, frustrated. And then recently, I started coming up with some new designs that I wanted to try out and I was back at my craft desk once again. Phew!

BACK TO THE CARD…

The sentiment is “hello” to say “hi” to you all after being MIA for so long. Thanks for being patient =)

I ordered some of the Die-namics dies from My Favorite Things, which arrived this week (very quickly seeing as they shipped from the USA). They. Are. Awesome.

They cut through felt so well – and there was me thinking they’d struggle, because to be honest, they don’t look like they’d cut through much more than paper. They don’t look fragile as such, just nowhere near as beefy as the dies you get from Sizzix or Provo Craft. But they do exactly the same job, whilst taking up much less room! Thumbs up from me there.

I demonstrate using one of the dies in the video below, the Mini Rolled Roses die, using felt. You will need fabric glue for this. Trust me, I tried with Glossy Accents and TomBow glue and neither worked. They just came apart afterwards. I actually believe a hot glue gun would be the best for this as it would hopefully fuse the materials together and set/dry almost instantly. I don’t have one, so do let me know if you try this with a glue gun. I want to know whether to invest as I’m far too impatient to wait 4 hours for the fabric resin glue to set (I ended up sewing these flower together in the end, just to get the video finished!).

The video is below. It’s a long one! But I do show you a lot =)

Please don’t forget to rate my videos and subscribe to me over at my YT Channel. Also, if you ‘follow’ my Facebook and Twitter pages, then you’ll always know when my next video/blog post is up.

Watch video below | Watch at YouTube